Untitled-3.jpg

Blog

DIY Fringe Earrings Using Leather

Check out my leather feather earrings!

I love that the look of these “feather” earrings is very artistic and not perfect.  It looks like paint was splattered all over the leather.  This method is perfect for someone like myself who tends to not draw straight lines and who has no time for rulers.  I like to eyeball everything. :)

Supplies:

– Leather

– Paint (I used an acrylic paint)

– Gold paint (you could also use gold leaf)

– 2 Earring wires

– 4 jump rings

– 7 inches of gold chain

– Paint brush

– Scissors

– Large safety-pin

– Pliers

– Wire cutter

– Feather template

{Step 1}:Cut out the feather template.  Then trace your feather pattern onto your leather.  Cut two feathers from your leather.

{Step 2}: Paint your feathers with your cobalt paint.  Let it dry.  Do another coat of paint and let it dry.

{Step 3}:  At the bottom of one of your feathers, start cutting small slits up and towards the center. Cut until you get to the top of your feather. Repeat with your other feather.  Make sure not to cut too close, you don’t want to cut off your leather.

{Step 4}: Take your gold paint and paint the bottom of your feather.  Remember, this does not have to be perfect!  Repeat with the other feather.

{Step 5}: Grab your safety-pin.  Push your pin through the top center of your feather.  Once through your feather, give your feather a little pull down to stretch the opening a bit.  Repeat on your other feather.

{Step 6}: Take your pliers and cut your chain so you have two chains, one that is  1 and 1/2 inches long and the other 1 and 1/4 inches long. Repeat this to get chain for your other feather.

{Step 7}: Use your pliers to open two jump rings.  Put one jump ring through one of your long chains and one of your shorter chains.  Repeat this step with your other two chains and other jump ring.

{Step 8}: Take your jump ring with your chains and put it through the opening you made in the top of your feather.  Once through, put your jump ring through your other closed jump ring.  Take your pliers and close your open jump ring.  Open your top jump ring and slide it through the opening in the bottom of your ear wire.  Close your jump ring.  Repeat this with your other feather.

 Enjoy!

meghan quinonesComment
Make a DIY Rope Necklace Out of Trim

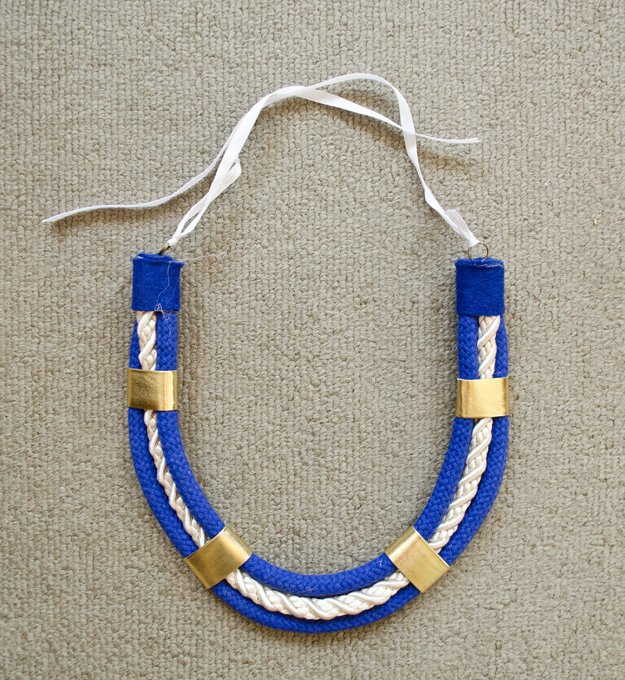
Well, here it is…My boat rope necklace!

I did not have access to boat rope (once again, I am a boat guest, not a boat owner) to make my necklace.   So, I found some rope at Joann’s that had a similar look and feel to it.   I believe real metal is used in my inspiration to hold the ropes together.  Once again, I did not have this so I did my best to use something that looked kinda, sorta similar.  P.S. My boat rope necklace is MUCH, MUCH, cheaper than my $300+ and $400+ inspiration necklaces!

Supplies:

– 1 yard of thick rope (I got blue from Joann’s in the trim section)

– 1/2 yard of thick rope (I got a cream color from Joann’s in the trim section)

– 1/8 yard of 1 and 1/2 inch thick gold plastic trim (this is something you would use to make a belt)

– Small piece of felt

– 2 5mm jump rings

– 1/2 yard of ribbon

– Scissors

– Thread

– Needle

– Glue gun with glue

– Clear tape

{Step 1}: Take your yard of rope (mine is blue) and cut it in half.  Take your tape and wrap it around all ends of your 2 ropes.  This will prevent your rope from fraying.

{Step 2}: Take one of your cut pieces of rope and lay it on your table so it is curved, with the ends at the top.   Lay your smaller piece of rope (in my case, this was my cream-colored rope) over the rope you just placed on your table.  Put one end of your rope next to the end of your first rope.  Cut the other end of your second rope so it is even with the other end of your first rope.  Take your tape and wrap it around both ends of the rope you just cut.

{Step 3}:  Take the other half of the rope you cut and lay it so it is over your second rope.  Once again, put one end of your top rope next to the end of your second rope.  Then line up the other end and cut.  Take your tape and wrap it around both ends of the rope you just cut.

{Step 4}:  Take your gold trim and cut it down the center so you have two pieces.

{Step 5}:  Then, cut your two strips in half (in the middle) so you have four pieces of gold trim.

{Step 6}:  Take your four gold trims and lay them under your rope so the nice side of each trim is facing down.

{Step 7}:  Fold over one end of your trim and put gun on the end of your trim.  Fold the ends together to glue your gold trim together.  Repeat this for all four trims.

{Step 8}: Cut your felt so it is an inch tall.

{Step 9}: Then, cut your felt so it is two and a half inches wide.  Use your piece of felt to cut another piece the same size.

{Step 10}:  Grab one end of your necklace and take all three ropes and wrap tape around them to secure them together.  Repeat this step on the other end of your necklace.

{Step 11}:  Put glue on your felt and wrap it around one end of your necklace so the top of your felt is level with the top of your necklace.  Repeat this step on the other end of your necklace.

{Step 12}:  Take your extra felt and cut out a circle that will fit over the top end of your necklace.  Repeat this step with the other end of your necklace.

{Step 13}:  Take your jump rings and sew one ring on the top center of each of your two felt circles.

{Step 14}:  Put glue all over the top exposed ropes and glue your felt circle to the top of your necklace with the jump ring facing out.  Repeat this step to the other side of your necklace.  Tie your ribbon to your jump rings. You are finished!

meghan quinonesComment
How To Make an Outdoor Pillow

My mom taught me to be thrifty as well as crafty.  She also taught me that all good room design begins with an inspiration.  This inspiration can be a pillow, a picture or even a vase.  I remember joking when I decorated my living room calling her with excitement and telling her I had found my “inspiration” pillow!  I built my entire design and theme of my living room around that pillow.  Having an element of inspiration to guide the way is much easier than trying to pull everything you like all into one space.

So, when I was trying to think about my inspiration for my back porch, I remembered that I had a yellow and cream striped rug thrown in one of my closets.  I pulled that baby out and decided I would reuse it and build my porch décor around it.

When I was at Joann’s I was on a search to find the perfect fabric to make pillows that meshed well with my rug, but also had other colors in it.  I was so excited when I saw this yellow, coral, and green stripe fabric.  Score!  My rug and my fabric for my pillows are my inspiration pieces and what I will use as a guide to redo my porch. :)

Supplies:

– 1/2 yard of outdoor (or canvas) fabric (I already had some outdoor pillows I had made last year, so I bought enough fabric to cover those.  You may need more or less depending on the size of pillow you want to make.)

– Bag of Poly-fil (once again, amount depends on the size of pillow you want to make)

– Scissors

– Straight pins

– Sewing machine

{Step 1}:  I folded my fabric in half width wise and then cut it in half.  This gave me two pieces of fabric so I could cover both of my pillows.

{Step 2}:  Fold your fabric in half  so the nice sides (pattern sides) are facing each other.  Grab your pins and start pinning from the lower left hand corner all the way around your fabric until you are about 4 inches from the lower ride had side of your fabric.  You can stop pinning here.  Start sewing your pillow at the lower left had side all the way around and stop when you get about 4 inches away from the lower right hand side.

{Step 3}:  Turn your fabric so it is right side out.

{Step 4}:  Grab your Poly-fil.  Start by ripping off small pieces of Poly-fil and stuffing it into your pillow.  You want to do smaller pieces so your pillow will have a nice shape to it.

{Step 5}:  Once your pillow has reached your desired “stuffed” level, stop.

{Step 6}:  Take the unfinished end of your pillow, fold it over, and tuck the fabric inside of your pillow.

{Step 7}:  Pinch the two tucked ends together and pin.   Sew the area you just pinned.  This will give your pillow a nice finished edge.

Finished!  That wasn’t too hard.

meghan quinonesComment
How to Embellish a T-Shirt

Time to get out your trim!  

I made this lovely shirt with three different kinds of trims.  It was surprisingly easy to make.  A little pin here, a little pin there, a quick sew and viola!

Are you planning on making this?  If so, send me pictures.  I would love to see what you come up with!

Supplies:

– T-shirt (or tank top)

– A yard of large pom-pom trim

– A yard of small pom-pom trim

– A yard of patterned metallic ribbon that is about an inch thick

– Straight pins

– Thread

– Scissors

– Sewing machine (or you could hand sew it)

{Step 1}: Take your ribbon and lay it so the nice side is facing down.  Then, lay your large pom-pom trim at the bottom of your ribbon so the pom poms are hanging below your ribbon.  Pin the strip your pom poms are attached to directly to your ribbon.

{Step 2}: Now, flip your ribbon over so the good side is facing up.  Take your small pom-pom trim and pin it to the top part of ribbon.

{Step 3}: Trim one of your large poms off from the end of your trim. 

{Step 4}:  Fold the end of your trim under and pin it to the back center of your shirt/tank top. 

{Step 5}:  Pin your trim all the way around your shirt/tank top.  When you get to the back of your shirt/tank top, cut your trim so it goes about an inch over where you started.  Once again, trim off 1 to 2 pom-poms, fold your trim under, and pin it to your shirt/tank top.  Sew all the way around your shirt/tank top. 

I sewed one row towards the top off my ribbon, then did another row through the middle of my ribbon to make sure it was nice and secure.

Enjoy!

meghan quinonesComment
How to Make a Friendship Bracelet

So, in order to get the look Madewell had going on with their bracelet, I decided to grab my trusty Trader Joe’s bag.  The handles were basically the perfect size, so I ripped those puppies right off so I could use them for my bracelet!  Instead of attempting the lovely pattern Madewell went with, I decided to go with altering shades of pink for my design.  What do you think?

Supplies:

– Handle from a Trader Joe’s Bag (you could also use any brown bag and fold it like the TJ handle)

– Embroidery thread in three shades of a color of your choice

– Felt

– Sew on snaps

– Thread and needle

– Scissors

– Glue gun and glue (I thought I would use regular glue initially, but decided hot glue would be stronger).

{Step 1}: Measure your wrist to determine the length of your bracelet.  Then, cut your handle using this measurement.  (Remember: you want your bracelet to be able to move, You don’t want it too tight).

{Step 2}:  Take one color of your embroidery thread and tie a knot around the end of  your bracelet.

{Step 3}:  Wrap your thread around your bracelet leaving space in-between.  The space doesn’t have to be exact.  When you get to the end of your bracelet, tie another knot to secure your thread.

{Step 4}: Repeat steps 2 and 3 with your other two colors of embroidery thread filling in the gaps with alternating colors.

{Step 5}:  Cut your felt about 2 inches wide.

{Step 6}:  Cut your felt about and 1/2 inch long.

{Step 7}:  Grab your snaps, open them up, and place them in the center of your felt.  Make sure  you have placed your snaps the correct way.  You will want to check that they will actually snap togther before you sew them in place.  Sew your snaps to your felt (this is just like sewing a button).

{Step 8}:  Center your felt (snap side facing down) at one end of your bracelet.

{Step 9}: Put hot glue on each end of your felt.  Fold each end over and glue it to your bracelet.

{Step 10}:  Repeat steps 8 and 9 on the other end of your bracelet.

{Step 11}:  Take your needle and thread and sew the open end of your felt together.  Do this on both ends.

 Your finished bracelet should look like this.

meghan quinonesComment
How to Make a Wine Bag Using A Paper Bag

Restaurants that offer BYOB (in my opinion) are the best!  I love that you can drink as much as you want without spending a ton of money.  I mean, the mark-up on alcohol is ridiculous!

Mike and I were at Binny’s a couple of weeks ago and he tried to convince me we needed to buy one of those neoprene BYOB carriers.  My response was “If you plan on going out after dinner, where do you put the bag?”  When I go out I don’t typically have a huge purse with me, so stuffing a BYOB bag into my clutch is not going to happen.  We ended up passing on the bag and just figured we would continue bringing our wine bottles wrapped in a plastic bag (I know, this is not all that pretty). 

Until, I had an idea…..

Why not make a BYOB bag out of a TJ bag, that way you look classy and can leave it behind if you are going out after dinner!  Umm, genius??  I kind of think so.

You could also whip up this little puppy and use it as a gift bag.  Throw a bottle of wine in the bag and wrap a tag around it and it becomes an instant gift bag for a house-warming party!

Supplies:

– Trader Joe’s bag

– Scissors

– Tape measure/ruler

– Glue  

{Step 1}: Measure 2 and 1/2 inches from the handle on your TJ bag. Make a cut with your Scissors (or mark it with a pen). Repeat this step on the other side of your bag.

{Step 2}: Where you made the cut on your bag, cut down and around your bag to the other side making sure you cut in a somewhat straight line. Repeat this step on the other side of your bag.

{Step 3}: Open up your (now smaller bag) and lay it on the floor. 

{Step 4}: Fold the edges of your bag down about an inch. I ended up flipping my bag over so the TJ wording was facing up.  This way, my I would have a plain brown bag.  You can, of course, keep the TJ wording on the outside of your bag.

{Step 5}: Cut your bag in the middle so your two sides are the same size.

{Step 6}: Fold the bottom of your bag over an inch.  Repeat this step with the half of your bag. 

{Step 7}: Put glue on the folded part on the bottom of one side of your bag. Glue the together two pieces together. Put glue on the folded part on the sides of your bag. Fold the side of your bagged glued over to glue it to the other side of your bag.

All finished! 

meghan quinonesComment
DIY Fabric Turban

It really is turban time here in Chicago.  The weather is really starting to warm up this week.  Now, we will see if it holds on.  My assumption is it will drop back to early fall temps in a couple of days, but we will see.  With temperatures rising, I am sure the humidity is sure to follow.  It appears I made my turban headband just in the nick of time!  For all of my fellow wavy-haired friends out there, I hope this helps tame your mane. :)

Supplies:

– 1/8 yard of fabric (I bought mine at Joann’s)

– Headband (I bought mine from Forever 21)

– 1 sheet of felt

– Scissors

– Hot glue gun (and glue)

– Thread

– Straight pins

– Sewing machine

{Step 1}: Since I bought my headband from Forever 21, I needed to do a small alteration.  I used some pliers to rip off the bow that was attached to my headband.

{Step 2}: Fold your piece of fabric in half so the printed side is facing in.  Pin along the long end of your fabric.

{Step 3}: Sew the long ends of your fabric together.  You will leave the small end openings unsewn.

{Step 4}: After you sew your fabric, turn your fabric so the pattern is right side out.

{Steps 5, 6, and 7}: Tie a knot in the center of your fabric.

{Step 8}: Loosen the knot you just made and slide your headband into the small opening of your knot.

{Step 9}: Take your fabric and form it over your headband.  Cut your fabric two inches below your headband.

{Step 10}: Trim the ends of your fabric at an angle. I went up about 3 inches.

{Step 11}:  Warm up your glue gun.  Put glue on the end of your fabric, then glue it to your headband.  Repeat this step on the other side of your headband.

{Step 12}: Put glue on one side of your fabric and glue to your headband folding your fabric in towards your headband.

{Step 13}: Put glue on the other side of your fabric and glue to your headband folding your fabric in toward your headband.

You are finished!  Enjoy your new turban headband.

meghan quinonesComment
How to Make Clay Beads

I am not going to lie, I am SUPER pumped about this DIY project!  My version of the lovely Anthropologie Cactus Paddle necklace turned out almost identical to theirs!  I went with a minty color (I am currently obsessed with anything and everything mint!).  Let me know what you think! Who plans on giving this CIY project a try?

Supplies:

– Fimo Effects Clay (any clay that can be baked. I got mine from Joann’s in “Mint”)

– Necklace Template

– Toothpick (or anything you can use to put a hole in your clay)

– Four 10mm jump rings

– Two 5mm jump rings

– One yard of ribbon

– Gloss shine (I used the spray kind)

– Jewelry pliers (or regular pliers)

– Knife

– Lighter

– Glue 

{Step 1}: Cut out the four pieces of the Necklace Template (above).  Then, pinch off a corner of your clay and roll it into a round ball.

{Step 2}: Roll out your dough until it is about 4mm thick. 

{Step 3}: Place your smallest “bead” on your clay and use your knife to cut around the entire template.  Cut out the number of “beads” on each template.

{Step 4}: After your “bead” is cut out, use your fingers to smooth around the edges as they will be a bit jagged from your knife.  Don’t push to hard, you don’t want to ruin the shape of the “bead”.  Once your bead is smooth, take your toothpick and make a hole in the ends of your “bead”.  Use your template as a guide.

{Step 5}: Repeat steps 1-4 for all of your “beads”.  Your “beads” should look like the ones below.

{Step 6}: Bake your beads according the directions on the package.  After they are done baking, let them cool off.  Once they are cool, spray them with your gloss spray, then let them dry.

{Step 7}: Take your jewelry pliers and open all of your jump rings.

{Step 8}: Take your 10mm jump rings and put them through the holes of your “beads” connecting them to one another.  Start with the largest “bead” working your way up to the smallest “bead”.  Then, take your 5mm jump rings and add them to the jump rings at the end of your smallest “bead”.

{Step 9}: Grab your yard of ribbon.  Fold it in half, then cut it. 

{Step 10}: Take your ribbon and fold the end of it over slightly so you have a loop.  Run the loop through your jump ring.

{Step 11}: Take your ribbon and run it through the loop you just made and pull.  This will secure your ribbon to your jump ring.  Take your lighter and run it over the exposed parts of your ribbon so they do not fray.  Dab some glue on the ribbon where you made your knot and glue to the back of the ribbon.

 You are finished!

meghan quinonesComment
DIY Faux Clay Vase Using Paper

It is hard to believe I (at one time) worked at CB2 for a hot second.  Even though I didn’t work there long, the one skill I took away from that gig was how to put tissue paper in gift bags.  Yes, I know how to properly fluff tissue paper in gift bags so it looks profesh.  Thank you, CB2.! So, when I get emails from CB2 I always check out their latest stock.  I love their mix of traditional and modern décor.   I saw the below clay vases and was inspired to do my own version using my trusty Trader Joe’s Bag.  Check it out!

{Photo credit: CB2}

Supplies:

– Trader Joe’s bag

– Clear vase

– Mod Podge

– Paint brush

– Scissors (optional) 

{Step 1}: Rip (or cut) pieces of your Trader Joe’s bag.  Anything goes!  I did varying sizes and shapes.  I probably used about one side of my bag for all of my paper pieces.

{Step 2}: Dip your paint brush into your Mod Podge and cover the back of your  piece of paper.  Make sure you put glue on the printed side of your paper.  Repeat this until you have covered your entire vase.

{Step 3}: Once your entire vase is covered, let the glue dry.

{Step 4}: Take your Mod Podge and “paint” over all of the paper covering your vase.  Let your glue dry.

meghan quinonesComment
How to Patina Earrings

Yay for earrings that have the look of patina, but not the smell (thanks, Shelby for pointing that out)!  These were super fun (and easy) to make.  I may have to “weather” everything brass lying around my apartment!

Supplies:

– Brass filigree drops (I bought mine at Joann’s)

– 2 brass earwires

– Green acrylic paint (I bought mine at Joann’s – color is “Traffic Light”)

– Paint brush

– Jeweler’s pliers/pliers

– Paper cup

– Paper plate (to paint on)

{Step 1}: Pour 3 drops of paint into your cup.  Then pour 3 drops of water into your cup.  Mix the paint and water together.  You want your pant to be watered down.

{Step 2}: Paint over both of your earrings completely covering them.  Let your earrings dry.

{Step 3}: Grab your earwires and pliers.  Take your pliers and open the loop at the bottom of your earwires.

{Step 4}: Take the open loop of your earwire and put it through the top loop of your earring drop going from the unpainted side through to the painted side.  Then, take your pliers to close the loop of your earwire.

Finished!

meghan quinonesComment
How to Make a Clay Necklace

Growing up I use to love playing with Play-Doh.  Something about the color, the texture, and the smell.  Oh, the smell… I remember I use to play with this contraption that I would attach little people to, that had holes in the tops of their heads.  I would crank a lever and the little people would grow Play-Doh hair.  I had hours of entertainment cutting and re-growing hair.  Ipad what? Oh, how entertaining kids has changed.

I never imaged that I would get the chance to play with clay again in my thirties.  To create my Oscar de la Renta look I decided to grab some clay and go to town.  Unfortunately this clay did not have the Play-Doh smell I remember, but I still had just as much fun creating with it.

Supplies:

– FIMO clay (I got mine from Joann Fabrics)

– Folk Art High-Shine Glaze

– Jewelry Chain

– Jewelry Wire

– 1 yard ribbon

– Jewelry Tools (you can use needle noses pliers if you have them)

– Red Felt (1 sheet)

– Hot Glue Gun (with glue sticks)

– Parchment Paper

{Step 1}: Cover your work area with parchment paper.  You want to make sure the clay doesn’t ruin your surface. Grab some clay and make a ball that is about an inch and a half in diameter.

{Step 2}: Start rolling your clay out on the table using your palm.

{Step 3:} Your clay should be getting longer and narrower.

{Step 4}: Grab 4 more clay balls and continue rolling them out until you get varying lengths of clay.  The longest is 15 in, the next two are 9 in, and the two smallest are 7.5 in.

{Step 5}: Take a rolling-pin (or the parchment paper tube if you do not have a rolling-pin) and lightly roll over your clay from end to end to flatten your clay (you don’t want it too flat).

{Step 6}: Start at one end of your rolled clay and start wrapping the clay around itself.  Do this for all of your clay “logs”.

{Step 7}:  Place your clay flowers on a baking sheet.  Bake your clay according to the package.  After your clay is done baking, let it cool.

{Step 8}:  Once your clay is dry, spray all of your flowers with the High-shine glaze.  Let dry.

{Step 9}: Grab your jewelry wire and preferred tools.  Place the wire at the tip of your tool.

{Step 10}: Bend the wire with your tool forming a loop.

{Step 11}: Lay your wire with the loop over your largest flower.  Cut the wire so your loop slightly hangs over your flower and the other end will slightly hang over the other end once the other loop is made.  This does not have to be exact.  Do this to all of your flowers.

{Step 12}: Your wire should look like this.

{Step 13}: Once you have made all of your wires, place the wire on top of each of your flowers, cut out small circles of felt.  Put glue on the back of your felt and place your felt over your wires.  This will glue the wire to your flower.

{Step 14}: Unwrap your chain.

{Step 15}: Grab two pliers.  Grab one end of your chain link with one of your pliers and the other end of the chain link with your other pliers.  Slide the two sides past one another to open up the chain link.

{Step 16 and 17}: Take one open side of your link and put it through one of the open loops on your largest flower. Use your two pliers to close the open link.  Count three links from your flower (or whatever desired length you would like), open the third link, take the rest of the links off and slide the open link into the loop of your next largest flower, then close the link with your pliers.

{Step 18}: Repeat this until you have linked all of your flowers together. You will want to add chain to your smallest flower that will go around your neck.  I used seven chain links on each side for this.

{Step 19}: Fold your ribbon in half and cut.

{Step 20}: You will now have two ribbons.  Fold each of the ribbons in half.

{Step 21}: Take the folded end of your ribbon and push it through the last chain link of your necklace.

{Step 22}: Take the two ends of your ribbon and run them through the loop you just made through the chain link and pull.  This will create a knot. Do this to the other side.

Tie your ribbon around your neck and you are finished!

meghan quinonesComment
How to Make a Paper Photo Mat

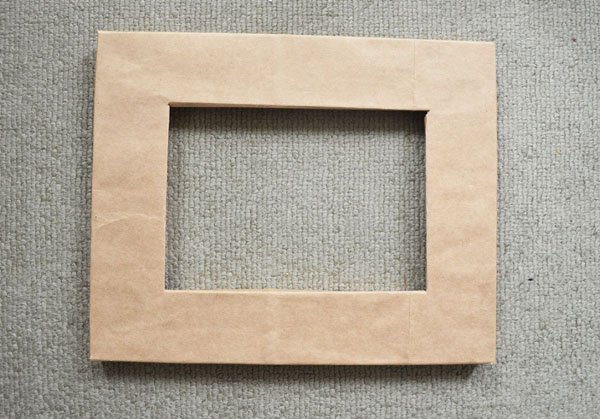
When I came across the below picture frame I thought, “Wow, that picture mat sure looks like a paper bag.”   A paper bag, huh?  Well, how about a Trader Joe’s paper bag?!?  The mat gives the picture a bit of a vintage vibe.  Love this!

Supplies:

– Picture frame with a mat

– Trader Joe’s Bag

– Scissors

– Glue

– Pencil

{Step 1}: Cut out one side of your Trader Joe’s bag.  Gently rip off the handles (They should come off pretty easy without ripping your bag).

{Step 2}: Place your mat on your bag and trace around the outside and the inside.  Make sure the side of the bag with the logo is facing you.

{Step 3}: Cut about a half-inch from your outside traced line and a half-inch away from your inside traced line. 

{Step 4}: Cut an angled slit on all four outer corners of your square and all four inner corners of your square.

{Step 5}: Fold the outside corner slits down like in the below picture.

{Step 6}: Place your mat back on your paper bag.  You will now fold the outer and inner edges over your mat and glue.   

You now have a nicely paper wrapped picture mat!

meghan quinonesComment
How to Edit a Photo for Artwork

When I took the picture of my gold vase I thought the detail of the ranunculus was very crisp looking.  So, I decided to zoom in, and in, and in.  The image I saw looked like artwork you would buy from an art store (or an actual fancy pants artist).

After seeing my new creation, my thought was you could probably zoom in on a lot of cool objects and backgrounds to get a cheap, cooling looking, piece of artwork.  I looked back at a few of my pictures from Thailand and thought my “zoom” technique would be p-e-r-f-e-c-t!

Check out some of my zoom artwork below.

meghan quinonesComment
DIY Updated Pumps Using Spray Paint

For those of you who know me well probably saw the make-up and thought “Is she really going to attempt to create her own make-up?!”.  I thought about it, but realized I should chillax on my crazy CIY ideas!

So, I decided the shoes would be a perfect (and easy) CIY to do.  I have two pairs of nude pumps I purchased from Target.  I love the heel height, which is why I own two pairs.  I wore the first pair into the ground, but felt bad getting rid of them.  I pulled them out and thought a little paint here and a little paint there, my shoes would be back in action!

Photo credit: Right: JCrew


Supplies:

– Pair of nude pumps

– Black glossy spray paint

– Gold paint (optional if you want a gold detail on the toe of your pump)

– Painter’s tape

Step 1: Place a strip of painter’s tape over the toes of both your shoes.  I went about an inch and a 1/4 from the tip of my pump.  Rip the tape in the middle to separate the shoes from one another.

 Step 2: Start taping the soles of your shoes.

Step 3: Make sure you really press down on your tape.  If you have gaps, the paint will get where you don’t want it.

Step 4: Tape the rest of your shoe where you do not want paint.  I know I am not good at being neat, so I figured I would tape the whole stinkin’ shoe!

Step 5: Spray the tips of your shoes black.

 Step 6: Spray paint your heels.

 Let your shoes dry.

Step 7: If you want gold detail on your shoe, remove the tape on the top of your shoe and  place another strip of tape just a little bit above the black to create a thin line.  Paint the thin line gold.  Let dry.

 And there you have it…black and tan shoes!

meghan quinonesComment
Ditch the Photo Album: Tell Your Story with a Photo Book
wedding albim 3.jpg

I also did a photo book of our honeymoon to Thailand.  I really wanted this book to be on our coffee table and look like a book about Thailand, as opposed to screaming “Our Honeymoon!!!!!”.  You can see I added captions to point out the different temples and places we had been.  I added a map with a flag in each place we visited before I added the pictures of that specific place (I have to thank my husband for this suggestion).  I also decoupaged different items (e.g. entrance tickets to temples, maps, boat rides, etc.) we had saved to the back of the book (just like I did in our wedding book). I love how it turned out.  I think it really tells the story of our trip around Thailand. 

I did our honeymoon book on standard landscape, with the standard paper (this is not as thick as my wedding book paper, but had a little lustre which worked great with all of the vibrant colors we had captured). I, once again, selected hardcover image wrap. 

wedding album 1.jpg

When my wedding was over I knew I wanted to create my own wedding book.  In my opinion I think the look of a photo book is much more interesting than that of a photo album.  Designing your very own photo book allows you more flexibly and creativity.  It allows you to tell a story. 

Being the creative control freak that I am, I wanted to design my own wedding book. My photographer had shown Mike and I beautiful wedding photo books that she could do for us.  Once I saw the price tag ($700.00) I almost fell over.  Really?  THAT much for a book??  After I thought about it, it made sense.  Those things take time to make and the paper is super thick and expensive.  I knew there had to be something similar I could do for a girl on a budget. 

wedding album 2.jpg

After I researched around, I stumbled upon blurb.com.  This is exactly what I had been envisioning.  This site lets you pick the size of the book, the cover type you would like and the paper quality.   You can completely customize the look of your pages.   I was also able to add text to some of the pictures.  For example, I added lyrics from the song we did our first dance to, to the top part of the picture of us dancing.   You can’t do that with a photo album! Well, you could, it just wouldn’t look as cool. :) 

Not being sentimental when it comes to cards, I ended up throwing all of our wedding cards away.  After I did, I felt guilty and thought there had to be a way to keep these without adding unnecessary clutter to my life.  So, I called my dad and had him fish all of my cards out of the garbage (trust me, he loves this.  He can find anything in a garbage can!)  I came up with the idea to cut out sayings and special pictures from our wedding cards and decoupage them on the back of our wedding book.  This turned out better than I had imagined! 

You can see how I organized my wedding “story” below.  My create-it-yourself (CIY) cost was $64.00 for the book and shipping. 

I did standard landscape, on matte finished paper (this is a little extra because the paper is thicker), with a hardcover  image wrap. 

wedding album 4.jpg
meghan quinonesComment
How to Make a Lace Covered Clutch

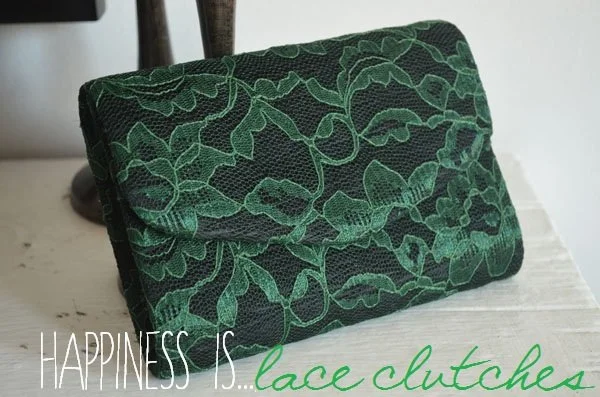
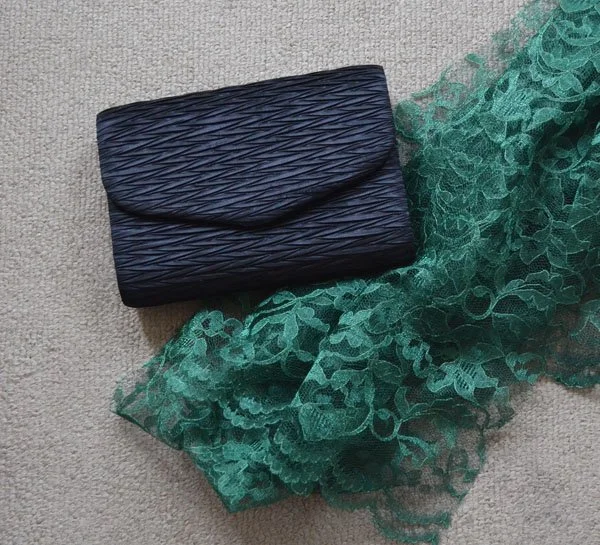
After doing this DIY I now want to cover everything in lace!  This was as easy as wrapping a gift (well, maybe a few extra steps).  My clutch is a little more basic than my inspiration pieces.  I did not include any adornments of sculls, jewels, or chains.  I am trying to keep this tutorial easy!

Supplies:

– Old clutch (mine is a $1 thrift store score!)

– Lace (enough to cover your clutch I got a 1/4 of a yard)

– Scissors

– Hot glue gun and glue

Step 1: Open your clutch and lay it on top of your lace.  Trim around the sides.  I trimmed my lace about an inch and a half away from my clutch.

Step 2: Trim the lace at the top of your clutch.  Once again, leave enough to cover the top.

Step 3: Pull your lace over the top of your clutch and glue.

Step 4: Trim the excess lace.

Step 5: Wrap your lace over the bottom of your clutch.

Step 6: Glue the lace to your clutch.

Step 7: If you have a metal clasp on your clutch, cut the lace around it so your clutch will close.

Step 8: Take the lace on the side of your clutch and glue it to your clutch.

Step 9: After your glue dries, cut off the excess lace.

Step 10: Now glue the excess lace on the sides of our clutch.

meghan quinonesComment
How to Make a Paper Pomander

I had a special CIY request to show how I made the paper pomanders I had at my wedding.  Well, here you go!

Supplies:

– Tissue Paper (I bought mine in bulk from www.papermart.com)

– Floral wire

– 1 and 1/2 inch styrofoam ball (the larger the ball, the bigger your pomander will be)

– Scissors

– Wire cutters

– Measuring Tape (a yardstick or ruler will also work)

Step 1: Lay out four pieces of your tissue paper. One on top of the other.  Mark your tissue paper every 6 and 1/2 inches.  This will give you 5 strips.  The last strip will be about 5 inches.

Step 2: Cut where you marked your tissue paper.  As you can see, I clearly didn’t cut all that straight. :)

Step 3: Cut your strips in half.  You will now have 10 strips of tissue paper.  Once again, not straight.  It really doesn’t matter. :)

Step 4: Take one of your strips of four sheets and fold them over about an inch.

 Step 5: Take your tissue paper and turn it over.  Fold your tissue paper over about an inch again.  Keep doing this until you get to the end.

Your paper should look like an accordion.

Step 6: Measure out 6 inches of your floral wire and cut.

Step 7: Fold your wire in half and wrap it around the middle of your folded paper.

Step 8: Twist the wire all the way to the end.  Use your wire cutters to cut off about a half-inch.

Step 9: Take your scissors and round the ends of your paper.

Step 10:  Open up your strip of paper so it looks like the beginning of a flower.

Step 11: Hold your flower by the wire.  Grab one sheet of tissue paper and pull it up.

Keep pulling up each piece of tissue paper.

After you pull up all of your tissue paper, your flower should look like the one below.

Step 12: Since I didn’t have a styrofoam ball lying around, I just used a decorative ball that was about the same size as the styrofoam ball you will need.  Take your flower and push the floral wire into your styrofoam ball.

Take your completed flowers and push them into your styrofoam ball until it is full.

For the ribbon, I bought gross grain ribbon and cut 2 ft strips.  I folded the ribbon in half and used floral pins to attach the ribbon to the styrofoam ball.  I then made a bow and tied it over the ribbon that was attached to my styrofoam ball.


meghan quinonesComment
DIY Upcycled Bottle Bud Vase

Mike and I were recently at Carriage House for brunch with my mom and her friend.  That’s what we do in Chicago, we brunch.  Mike and I can never get our act together to get out of the house during real breakfast hours, so brunch allows us to eat breakfast at 1:00pm and not feel bad about it.

First off, Carriage House is adorable.  I kind of want to live in this restaurant because the decor is rustic and oh so cozy.  When we were seated at our table, each chair had a little blanket on the back of it.  Talk about attention to details!  As I looked around and took in the rest of the decor I saw a man drinking a pony beer.  I immediately became obsessed with it.  It was such a cute, stubby, beer.  Why have I never seen a pony beer before?  Mike, being the loving husband he is, ordered a Bloody Mary (which came with a pony beer) and gave the beer to me.  This is another reason I like brunch.  It is much more appropriate to drink at brunch, than at breakfast. :) I enjoyed my adult beverage and left with the cute bottle.

After we left, I was thinking this would make a cute bud vase.  I wanted to add a little pizzazz to it, but wasn’t sure exactly where my vision would take me.

From time-to-time I will check out Style Me Pretty to see what 2013 brides are doing for decor, etc. When I was last out there I saw these cute CIY vases.  Umm…perfect for my bottle!

Photo Credit: Style Me Pretty

Supplies:

– Glass bottle (if it has a label on it, soak it in warm water to remove it)

– Gold  Paint (I used metallic, but SMP used gold leaf)

– Paint Brush

– Painter’s Tape (optional)

Step 1: Decide how high up you want your gold color to go.  Once you have decided, put your painter’s  tape around your bottle.

Step 2: Start painting your bottle all the way around.  Let it dry.

Step 3:  Put about 3 layers of gold paint on your bottle.  This will cover it nicely.  Let the paint dry.

Step 4: Once your paint is dry, very slowly remove your tape.  You may notice some bubbling at the top of your bottle, just smooth this down with your finger.

I went to Asrai Garden, the flower shop at the end of my street, and found these lovely flowers.  I know the one deep red one is a Ranunculus.  I love these flowers.  They are currently my favorite flower.  Not sure what the other two are, but I thought they would look pretty with my Ranunculus.

I cut my flowers down and put then in my cute new gold vase.  Who would have thunk a beer bottle could be so pretty?  Enjoy!

meghan quinonesComment
How to Sew a Pleather Tote

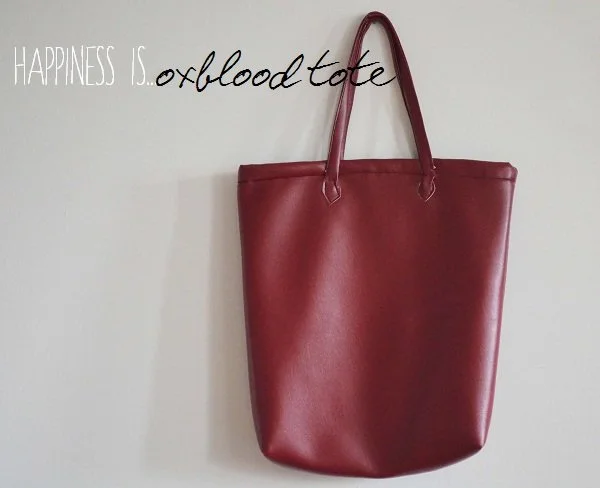
I love my Joann’s.  It seriously has the best selection of fabrics.  There is an entire section of vinyl fabrics in different colors and textures.  I came across this “oxblood” fabric and thought it was spot on.  Not bad, considering my inspiration bags were leather.

Supplies:

– 1/2 yard “Oxblood” colored vinyl fabric

– 1/2 yard black cotton fabric (to use as your bags liner)

– 1/2 yard fusible fleece

– Thread to match your vinyl (make sure this is heavy-duty thread)

– Scissors

– Sewing machine

– Heavy duty sewing needle

– Straight pins

Step 1: Take your vinyl fabric and fold it in half.  Clearly I decided to crumple my fabric when it was in my bag.

Step 2: Cut 3 1/2 inches from the top of your fabric (make sure you do not cut on the fold).

Step 3:  You should now have 2 wide pieces of fabric.  These will be used to make the handles of your bag.  Take your two pieces of fabric and lay them out so they are horizontal. Fold them in half lengthwise and cut.  You should have 4 strips of fabric that are about 2 1/2 inches wide.

Step 4: Fold your black liner in half and lay on the floor.  Put the body of your bag on top of your liner.  Make sure you put the fold of the vinyl on the fold of the liner.  Use this as your pattern.  Cut around the body of your purse.  This will make your liner the same size as the body of your bag.

Step 5:  Take your fusible fleece and fold it in half.  Put your liner on top of your fusible fleece.  Make sure you put the fold of your liner on the fold of your fusible fleece.  You will use the liner as your pattern.  Cut out the same size fusible fleece as your liner.

Step 6: Unfold your fusible fleece and liner – it will now be a long rectangle.  Place your liner on the sticky side of your fusible fleece.  Follow the instructions that came with your fusible fleece for your iron setting.  Iron over your entire liner.  This will glue your liner to the fusible fleece.

Step 7: Take your vinyl fabric and unfold it.  This will give you the same shape as your liner and fusible fleece.  Take your vinyl and turn it over so the good side of your fabric is facing the floor (the yucky side of the vinyl will be facing up).  Take your, now glued, fleece and liner and put the fleece side on top of the yucky side of your vinyl.  Pin everything together.

Step 8: Now that everything is pinned together, fold your fabric in half so the red side of your fabric is facing itself (your purse will be inside out).  Start sewing from the top right side of your bag.  You will work your way around until you get to the top left part of your bag.  Once you get here, stop.

Step 9: Take the bottom right side of your bag and push it down so you get a triangle.

Step 10: Sew over your triangle.  Do this to the other side.  This will give your bag more of a “bucket” look.  Turn your purse so it is right side out.

Step 11:  You will now take two of your strips of fabric for your handles and pin them together just at one end.  Make sure the red colors are facing each other.  Do this to the other 2 strips of vinyl.  This will make your straps longer.

Step 12: Sew both of your strips of fabric so you now have 2 long strips of fabric.

Step 13: Fold the ends in and then fold the strip in half.  This will leave nice clean edges when you sew.  Do this to both of your handles.

Step 14: Pin your handles.

Step 15:  Start sewing 1 1/2 inches from the end of your handle (see below pic – you can see the fabric that is not sewn).  Keep sewing until you get 1 1/2 inches from the end.  Once you get here, stop.  Do this to both of your handles.

Step 16: Just kidding.  Skip to step 17. :)

Step 17:  Time to sew the top of you bag.  You want to turn in the rough, unfinished edges of your bag and pin.  Make sure you have a nice finished edge as this will be the top of your bag.

Step 18:  Now that the top of your bag is finished, time to sew on your straps.  I cut the ends of my straps (the areas that were not sewn) into points.  I liked the look of it, but you can keep them as rectangles if you want.  Pin the bottom of your straps to the body of your bag (I went about 1 1/4 inches down).  Sew around the edges of the straps to secure them to the bag

meghan quinonesComment
How to Use Mod Podge and Glitter for Earrings

I decided to ease in to sparkle and glitter.  I decided to make glitter earrings.

Supplies:

·         2 Buttons (preferably with a divot to hold the glitter)

·         2 earring posts

·         Mod Podge

·         Pliers

·         Super glue

·         Paint brush (or Q-tip)

Step 1: Cut the back off of your buttons.  I used pliers to do this. 

Step 2: Cut the back off of your other button. 

TIP: If the back of your button is not smooth, use a lighter to melt the button (if it is plastic) and then use your pliers to cut the excess off.

Step 3: Take your paint brush (or Q-tip) dip it in your Mod Podge and fill the inside of your button with Mod Podge.

Step 4: Fill your button with glitter.

Step 5: Fill it all of the way to the top! Let the glue dry.

TIP: I would wait 2 hours or so to make sure the glue is completely dry.

Step 6:  Once the glue has dried, shake off the excess glitter.

Step 7: Put super glue on the back of your earring post and glue to the back of the buttons. I would wait an hour or so to make sure the super glue is completely dry.

Enjoy your new glitter earrings!


meghan quinonesComment