Untitled-3.jpg

Blog

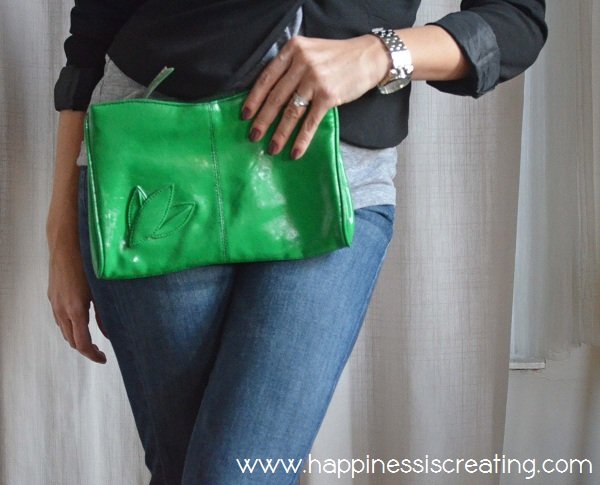
How to Spray Paint a Leather Purse

When I decided to spray paint a purse (to get my desired bright green color) I decided to head to the thrift store.  I got a green leather purse for $4. Score! I figure if this was a huge miss at least I didn’t spend a lot of money on it.

Supplies: 

Old purse (thrifted or used is best!)

Green spray paint

Tarp (or another item to cover your table)

Optional: Painter’s tape (if you have hardware on your purse that you do not want paint to get on)

Step 1: Wipe off your purse to get rid of any dust or dirt. Lay your tarp down (or in my case your box). Start spraying!

Step 2: Let your purse dry.

TIP: I would let your purse dry overnight.  If you think you need more coverage, hit your purse with more paint!

Enjoy!


meghan quinonesComment
DIY Initial Wooden Sign

Add custom flair to your holiday décor this season with a DIY initial wooden sign!

When the holidays roll around, I love adding new pieces to my décor.  It’s fun to switch out the old with something new and fresh.  This year I decided to add a custom piece that’s not only perfect for the holidays, but can also be used as everyday décor!  How awesome is that?  I love when pieces can transition from holiday to everyday use!  

Check out the full video tutorial below to see how to make your own DIY initial wooden sign!

Materials:

Step 1: Add a layer of white acrylic paint to the wooden square shape.  Let the paint dry.  If it needs additional coverage, add another coat of paint.

Step 2: Add a coat of paint to the top of the initial letter as well as the full last name using a foam paint brush.  For both of these, you’ll only be painting the top–the sides will have the pretty wood finish

Step 3: Once the paint is dry on the initial letter and last name, use sandpaper to rough up the edges and top to give both a rustic look.

Step 4: Using a paper trimmer, cut 8 strips of red vinyl measuring ¼" and 2 strips measuring ½".

Step 5: Starting with the ½" vinyl pieces, peel off the backing of both and add them to the center of the wooden square in the shape of a cross.  Press down on them with your hand to make sure they’re adhered. Then, add two ¼" vinyl pieces to each side of the ½" vinyl piece, leaving a space of ¼".  You”ll do this step with both the horizontal ½" strip and the vertical ½" strip.

Step 7: Flip the wooden square over and trim any excess vinyl using a craft knife or scissors.

Step 8: Add adhesive to the back of the initial letter and glue it the wooden square.  The last name will be glued below.

Step 9: Cut the wooden trim so you have 2 pieces of 12” trim and 2 pieces of 11 ½" trim.

Step 10: Using a foam paint brush, add stain to all 4 of the trim pieces.  Then, use a paper towel to remove the excess stain.  Let all of them dry.

Step 11: Starting with one of the 12” pieces of trim, add adhesive to the back and add it to the top of the wooden square.  Then, add the other 12” piece to the bottom.  Add the other two trim pieces to the sides.

That’s it!  You are now left with a beautiful and custom home décor piece for the holidays and beyond!  To take this project one step further, you could add a different paint color to the wooden square and choose a different color of vinyl.  Since this project is 100% customizable it also makes the perfect gift! If you want to make your own DIY initial wooden sign, head on over to Craft Cuts were you can currently get 20% off their website. Don’t wait, this sale ends November 17th! After that, you can use MEGHAN10 to get 10% off of your order until November 20, 2021!

meghan quinonesComment
DIY Fruit Ornaments Using Beacon Adhesives Glitter-It
EasyDIYGlitterFruitOrnaments_Styled2.jpg

Add some sparkle to your Christmas tree this holiday season with these playful DIY glitter fruit ornaments!

If you’re looking to break out of the traditional red and green ornaments this Christmas season, glitter is really all you need.  Beacon Glitter-It is the perfect adhesive to add shimmer and shine into any glass object, which is why it’s perfect for these DIY glitter fruit ornaments.  Since the glitter is on the inside of the ornament, there’s no need to fear it landing all over your home! When the lights from the tree hit the glitter, it looks like tiny shimmery diamonds!

EasyDIYGlitterFruitOrnaments_Styled3.jpg

Supplies:

  • 3 Glass 50mm Ornaments

  • Beacon Glitter-IT

  • Glitter (Yellow, Orange, and Red)

  • Beacon Power-Tac

  • Green Felt

  • Scissors

  • Scrap Piece of Paper (to make a funnel)

  • White Acrylic Paint

  • Paint Brush

  • Twine

  • Ruler

  • Black Sharpie

  • 1 TBL. White Vinegar and 1 c. Warm Water (for Cleaning)

  • Paper Plate

EasyDIYGlitterFruitOrnaments_Supplies.jpg

Step 1: Before you get started, you’ll need to clean the inside of the ornaments.  To clean, add one tablespoon of white vinegar to one cup of warm water and pour a small amount into the ornament.  Swirl it around to thoroughly clean the glass and then empty the ornament and rinse well with warm water.  Finally, turn your ornament upside on a plate to dry.


Step 2: Once the ornament is dry, add a small amount of Glitter-It into the inside and swirl it around to coat the entire inner surface (add more if needed).  

EasyDIYGlitterFruitOrnaments_Step2a.jpg
EasyDIYGlitterFruitOrnaments_Step2b.jpg

Step 3: Then, slowly pour the excess adhesive back into the bottle spinning the ornament to cover the top with adhesive.

Step 4:  Immediately add about 1 teaspoon of fine glitter to the inside.  Use a piece of paper to create a funnel if your opening is too small. 

EasyDIYGlitterFruitOrnaments_Step4.jpg

Step 5: Rotate and shake the ornament until the inside of the ornament is completely covered with glitter.  Then, turn the ornament upside down and shake away any excess glitter.  Let it dry for about 10 minutes and replace the ornament hanger. Repeat the above steps to add yellow and orange glitter to the other 2 ornaments.

EasyDIYGlitterFruitOrnaments_Step5.jpg

Step 6: Next, dip the end of a paint brush into white paint.  Then, make dots all over the ornament to create the look of seeds.

EasyDIYGlitterFruitOrnaments_Step6.jpg

Step 7: To make the strawberry stem, cut out a green felt circle measuring 55mm.  Fold it in half, and then in half again.  Snip off the point.  Then, cut two triangles in the other end.

EasyDIYGlitterFruitOrnaments_Step7.jpg

Step 8: Pull the stem over the top of the ornament and use Power-Tac to glue down the leaves.

EasyDIYGlitterFruitOrnaments_Ste8.jpg

Step 9: For the orange, cut a small leaf out of the green felt. Then, use Power-Tac to glue it to the top of the ornament.

EasyDIYGlitterFruitOrnaments_Step9a.jpg
EasyDIYGlitterFruitOrnaments_Step9b.jpg

Step 10: Use a Sharpie to add V’s all over the ornament.

EasyDIYGlitterFruitOrnaments_Step12.jpg

Step 11: To make the pineapple leaves, cut a strip of felt 5.25” long and 1.5” tall. Then, cut in leaves, stopping about a .25” from the bottom.

EasyDIYGlitterFruitOrnaments_Step10a.jpg

Step 12: Add a dab of Power-Tac to the metal ornament holder and add the felt stem.  Wrap the remaining felt around, adding glue to the end of the felt to secure it.

EasyDIYGlitterFruitOrnaments_Step11.jpg

Step 13: Finally, cut a piece of twine 6” long, fold it in half, place the fold inside of the loop on the ornament, pull the strings on the other end through, and tie.

EasyDIYGlitterFruitOrnaments_Ste13.jpg

Not only are these DIY glitter fruit ornaments the perfect accessory for your tree, but they would also make a great holiday gift, or the perfect DIY for an ornament exchange!

EasyDIYGlitterFruitOrnaments_Styled4.jpg
EasyDIYGlitterFruitOrnaments_Styled1.jpg

Be sure to use MEGHAN20 for 20% off ALL craft glues on Beacon’s website. Limit one coupon per customer, per transaction. Not valid with any other coupons and orders over $300.00 and is valid until December 31st at 11:59 PM EST. Coupon only available to residents who live in the continental USA.

DIY Patina Looking Earrings Using Acrylic Paint

Yay for earrings that have the look of patina, but not the smell (thanks, Shelby for pointing that out)!  These were super fun (and easy) to make.  I may have to “weather” everything brass lying around my apartment! 

patina earrings 1.png

Supplies: 

– Brass filigree drops (I bought mine at Joann’s) 

– 2 brass earwires 

– Green acrylic paint (I bought mine at Joann’s – color is “Traffic Light”) 

– Paint brush 

– Jeweler’s pliers/pliers 

– Paper cup 

– Paper plate (to paint on) 

(Step 1}: Pour 3 drops of paint into your cup.  Then pour 3 drops of water into your cup.  Mix the paint and water together.  You want your pant to be watered down. 

{Step 2}: Paint over both of your earrings completely covering them.  Let your earrings dry. 

{Step 3}: Grab your earwires and pliers.  Take your pliers and open the loop at the bottom of yourearwires. 

{Step 4}: Take the open loop of your earwire and put it through the top loop of your earring drop going from the unpainted side through to the painted side.  Then, take your pliers to close the loop of yourearwire. 

DIY Patina Looking Earrings Using Acrylic Paint

 Finished! 

{Photo credit: Top – People StyleWatch Magazine 

Trader Joe’s Bag Challenge: Project 4 – “Clay” Vase
tj bag vase 2.png

It is hard to believe I (at one time) worked at CB2 for a hot second.  Even though I didn’t work there long, the one skill I took away from that gig was how to put tissue paper in gift bags.  Yes, I know how to properly fluff tissue paper in gift bags so it looks profesh.  Thank you, CB2.! So, when I get emails from CB2 I always check out their latest stock.  I love their mix of traditional and modern décor.   I saw the below clay vases and was inspired to do my own version using my trusty Trader Joe’s Bag.  Check it out! 

tj bag vase 1.png

{Photo credit: CB2

Supplies: 

– Trader Joe’s bag 

– Clear vase 

– Mod Podge 

– Paint brush 

– Scissors (optional)  

{Step 1}: Rip (or cut) pieces of your Trader Joe’s bag.  Anything goes!  I did varying sizes and shapes.  I probably used about one side of my bag for all of my paper pieces. 

{Step 2}: Dip your paint brush into your Mod Podge and cover the back of your  piece of paper.  Make sure you put glue on the printed side of your paper.  Repeat this until you have covered your entire vase. 

{Step 3}: Once your entire vase is covered, let the glue dry. 

{Step 4}: Take your Mod Podge and “paint” over all of the paper covering your vase.  Let your glue dry. 

tj bag vase 3.png
Easy Color-In Fabric Artwork
Easy Color-In Fabric Artwork.jpg

Since I am always on the hunt for affordable artwork, I thought I would share one of my other CIY artwork projects with you.  I mean, there is nothing better than displaying your own artwork in your home, right?  When you do, you have complete control of the artwork itself.  I like the look of expensive artwork, however, my beer budget can only get me so far.  That’s why I try to mimic (i.e take inspiration) from artwork that I would only be able to afford on a champagne budget.  

When I was decorating our back bedroom (aka my studio) I wanted to get some artwork but didn’t want anything expensive.  I was at Ikea collecting all of my decorations (yay for Ikea for having a HUGE selection of affordable options!) when I came across this black and white floral patterned fabric.  Instantly I thought it would go well with my black and yellow themed room.  When I saw this fabric I thought it looked like a page out of a coloring book.  So, I grabbed my markers and went to town coloring the flower balls yellow!  The possibilities are endless.   This is so easy even a kid could do it! That is, if they can stay in the lines! 

Hmmm…It appears as though I need to invest in a level when hanging my pictures… 

I also bought my frames from Ikea.  I painted the plain wooden frame black.  I took the plastic cover and laid it over my fabric, traced around it, and cut out my fabric so it was the same size as my frame.   I then colored in the flower balls with a yellow marker. 

I took my colored fabric and placed it in the frame. Hello, one-of-a-kind artwork! 

I used a similar method with the below artwork.  I googled flowers, picked the styles I liked, printed them off in black and white, and then colored in the white parts of the flower yellow. 

Easy Color-In Fabric Artwork.jpg
DIY Upcycled Beer Glass into a Trendy Vase
DIYUpcycledBeerGlassintoaTrendyVase.jpg

Mike and I were recently at Carriage House for brunch with my mom and her friend.  That’s what we do in Chicago, we brunch.  Mike and I can never get our act together to get out of the house during real breakfast hours, so brunch allows us to eat breakfast at 1:00pm and not feel bad about it. 

First off, Carriage House is adorable.  I kind of want to live in this restaurant because the decor is rustic and oh so cozy.  When we were seated at our table, each chair had a little blanket on the back of it.  Talk about attention to details!  As I looked around and took in the rest of the decor I saw a man drinking a pony beer.  I immediately became obsessed with it.  It was such a cute, stubby, beer.  Why have I never seen a pony beer before?  Mike, being the loving husband he is, ordered a Bloody Mary (which came with a pony beer) and gave the beer to me.  This is another reason I like brunch.  It is much more appropriate to drink at brunch, than at breakfast. :) I enjoyed my adult beverage and left with the cute bottle. 

After we left, I was thinking this would make a cute bud vase.  I wanted to add a little pizzazz to it, but wasn’t sure exactly where my vision would take me. 

From time-to-time I will check out Style Me Pretty to see what 2013 brides are doing for decor, etc. When I was last out there I saw these cute CIY vases.  Umm…perfect for my bottle! 

beer vase 1.jpg

Supplies: 

– Glass bottle (if it has a label on it, soak it in warm water to remove it) 

– Gold  Paint (I used metallic, but SMP used gold leaf) 

– Paint Brush 

– Painter’s Tape (optional) 

 Step 1: Decide how high up you want your gold color to go.  Once you have decided, put your painter’s  tape around your bottle. 

 Step 2: Start painting your bottle all the way around.  Let it dry. 

 Step 3:  Put about 3 layers of gold paint on your bottle.  This will cover it nicely.  Let the paint dry. 

Step 4: Once your paint is dry, very slowly remove your tape.  You may notice some bubbling at the top of your bottle, just smooth this down with your finger. 

I went to Asrai Garden, the flower shop at the end of my street, and found these lovely flowers.  I know the one deep red one is a Ranunculus.  I love these flowers.  They are currently my favorite flower.  Not sure what the other two are, but I thought they would look pretty with my Ranunculus. 

I cut my flowers down and put then in my cute new gold vase.  Who would have thunk a beer bottle could be so pretty?  Enjoy! 

DIYUpcycledBeerGlassintoaTrendyVase.jpg
DIY Lace Clutch from Thrifted Purse
lace clutch1.jpg

After doing this CIY I now want to cover everything in lace!  This was as easy as wrapping a gift (well, maybe a few extra steps).  My clutch is a little more basic than my inspiration pieces.  I did not include any adornments of sculls, jewels, or chains.  I am trying to keep this tutorial easy! 

lace clutch 2.jpg

Supplies: 

– Old clutch (mine is a $1 thrift store score!) 

– Lace (enough to cover your clutch I got a 1/4 of a yard) 

– Scissors 

– Hot glue gun and glue 

 Step 1: Open your clutch and lay it on top of your lace.  Trim around the sides.  I trimmed my lace about an inch and a half away from my clutch. 

 Step 2: Trim the lace at the top of your clutch.  Once again, leave enough to cover the top. 

 Step 3: Pull your lace over the top of your clutch and glue. 

Step 4: Trim the excess lace. 

Step 5: Wrap your lace over the bottom of your clutch. 

Step 6: Glue the lace to your clutch. 

Step 7: If you have a metal clasp on your clutch, cut the lace around it so your clutch will close. 

Step 8: Take the lace on the side of your clutch and glue it to your clutch. 

Step 9: After your glue dries, cut off the excess lace. 

Step 10: Now glue the excess lace on the sides of our clutch. 

DIY Taxi Gloves Out of a Thrifted Sweater
taxi gloves.jpg

I remember when I moved to the city and hailed my first cab.  I felt so cool because I was officially a city girl!  When I saw the cute taxi gloves I thought they were the perfect accessory for a city girl.  I mean, gloves that actually work for you?  Um, yes! When I decided to make the taxi gloves I headed straight to the thrift store.  The store I go to hangs clothing items by color. Genius!  It was so easy for me to track down the sweaters and find the perfect yellow sweater hanging on the rack. 

Supplies: 

  • Sweater (preferably wool because you will want to wash and dry your sweater first.  Wool will felt up nicely) 

  • Black Felt 

  • Black thread 

  • Sewing needle 

  • Thread 

  • Scissors 

My Wedding: 7.7.12

Mike and I got married on July 7, 2012.  The day was seriously awesome!  I know everyone says that, but we were surrounded by all of our family and friends, the booze was flowing and the music was amazing.  How could it NOT be the best night ever?!

Being the thrifty person I am when I got engaged I knew I would try my hardest to keep things affordable and unique. I knew I was going to be a “Budget Bride”.  Mike and I are not cookie cutter and we did not want a wedding that was.  We planned our wedding as a party that celebrated us.  We kept some of the wedding traditions and got rid of others.  If we didn’t want to do something, we didn’t do it.

My challenge was to keep things affordable and to craft my face off!  Which, if you look at my wedding pictures below you will see I did just that.  It was so satisfying to know I had come up with our wedding vision and had executed it on a dime.  Seeing everything come together on our wedding day was awesome!

From the very beginning Mike and I knew we wanted to put the bulk of our wedding funds towards our honeymoon. We wanted this to be an amazing bucket list trip, an experience we both would never forget.  By doing our wedding on a budget, we were able to do just that.  Having saved some serious cash on our wedding, we were able to fly around Thailand (Bangkok, Chiang Mai, Koh Samui, Koh Pha Ngan, and Koh Tao) for 14 days with no budget, which meant 5 star lodging.  Our honeymoon cost more than our reception!

Check out all of my wedding CIYs below to see how I was able to pull off a budget friendly wedding!

01-MeghanMike-GettingReady010-e1357251518432.jpg

These were the two dresses I wore at my wedding.  I decided to have two dresses because I knew my wedding day was going to be hot (I wasn’t expecting 102 degrees!) and wanted to be cool for the dancing part of my reception.  We had a live band and I knew I was going to dance my butt off.  No one wants to see a sweaty bride! ;)

04-05-12_0042.jpg

I bought my long dress in New York at RK Bridal.  My mom and I took a special trip to NY so I could try on the sample.  It was such an awesome trip and I get to feel fancy when I tell people I bought my wedding dress in NY.  When I tell you how much I spent on my dress you are going to fall out of your chair.  My dress was by Jim Hjlem, but the kicker is…it’s actually a bridesmaid dress that came in ivory!  So, my long dress ended up costing me $225.00 (and that’s with shipping!).

My short dress was from Nordstrom.  It was a Taylor Dress.  This little number set me back $170.00.

So, my trip to NYC, my long dress, and my short dress ended up costing about $500.00 less than the average bride spends on one dress! Proud of my thriftiness? You bet!

01-MeghanMike-GettingReady011-e1357251553524.jpg
04-05-12_0026.jpg

I had two pairs of shoes, one pair for my long dress and another pair for my short dress.  I created the jeweled “shoe pops”, as I like to call them.  These were actually brooches I bought from a craft store.  They matched my gun metal accessory theme perfectly. I took the pin off of the back and glued on an alligator clip so I could clip them to my shoes.

I also refashioned the purse.  I bought an ugly white bridal purse from a craft store for $7.00 along with some gray silky fabric.  I cut strips of silk and cut out notches so it kind of looked like leaves.  I then made a ruffle out of my strips and then glued them to the top of my purse.

01-MeghanMike-GettingReady013-e1357251655308 (1).jpg

These were the shoes I wore with my long dress.  They were pretty ugly when I bought them.  They were on sale for $17.00.  I figured if I ruined them from attempting an alteration, no big deal since they were so cheap.

When I got them they had crisscross leather straps over the toes and a strap going from the top of the shoes up to the ankle strap.  I cut off some of the toe straps, the middle strap, and the strap that went around the ankle.  I bought some orange silk fabric, made a bow, and glued it to the straps over the toes.

04-05-12_0033.jpg
01-MeghanMike-GettingReady032-e1357269730982.jpg

This is the bracelet I wore for my wedding.  I made it from beads I ordered from China.  I made three strands of beads and just braided them together.  This looks like it would be heavy, but it is very light.  Like I said, the beads were from China, so they were made out of the cheapest material on Earth.  Total cost of bracelet ~$7.00.

02-04-12_0063.jpg

When I made the executive decision to wear my short, bobbed hair up in a crazy teased pompadour, I knew I needed something fancy for the back.  I used my gun metal beads and just wire wrapped them making “trees”.  I then wired my “trees” onto a hair comb.

I also made my earrings.  I used the same beads from China to make these super easy cluster drop earrings.  Once again, they were very light on my ears. :)

I had gone to a couple of local salons for a make-up trial, but was far from pleased with what I got.  I wanted to look like the best version of myself, but got a super dark-eyed, unrecognizable me!  It was at that point I decided I would do my own make-up.  I mean, I was doing everything else, why not add make-up to my list of to-dos?

I went to the Bobbi Brown make-up counter for a free make-up application.  I ended up loving the look, and did I mention this was FREE????  I bought all of the make-up that had been used on me.  As the months went by I bought up Bobbi Brown brushes to help me master my look.  I spent hours watching Bobbi Brown online tutorials and applying and removing false eyelashes.  On the day of my wedding I was so relaxed while putting my make-up on because it was now part of my normal routine.  I am so happy that I decided to drop around $200 on make-up that I was able to use for months, as opposed to a one-time wedding day make-up application. :)

01-MeghanMike-GettingReady027-e1357269522500.jpg
05-13-12_0069.jpg
05-13-12_0098 (1).jpg
05-13-12_0100 (1).jpg

My gift to my bridesmaids was their jewelry (which I made), flips flops (one thing I DID NOT make :D), and  tote. I made the tote out of felt.  I found cute orange flower fabric that looked like it could be from Anthropologie.  I cut out the flowers from the fabric and used wonder under to glue the flower fabric to the felt bags I made.

05-18-12_0132.jpg
05-18-12_0134.jpg

In an effort to keep costs down, I decided to design all of my stationary.  What I did was take a 8.5 x 11 sheet of paper and design all of my invitation items from this one sheet of paper. My invitation was 5×7 and the response card was the proper size for a postcard, which meant cheaper postage!  I designed and created all of my stationary in publisher.  I sent my one page PDF to a printing company who printed and cut my stationary.  I bought my envelopes from a store when I was in NY and had a custom stamp made with our return address.  Total cost for wedding stationary, postage to send, and return postage: ~$375.00.

03-MeghanMike-Details010-e1357271158852.jpg
03-MeghanMike-Details011-e1357271211472.jpg

I designed and printed my wedding programs as well. I bought my own card stock from a craft store for $2.99 and was able to get 3 programs per page.  I cut out each program, folded it in half, and tied a string on it.

03-MeghanMike-Details020-e1357271270548.jpg

This is a bridal hanger my mom made for me!  She is also VERY crafty and helped with a large portion of my wedding craftiness.

03-MeghanMike-Details001-e1357270708142.jpg

I decided the door of the church needed a little pizzaz so I decided to make two “M’s” for “Mike and Meghan”. :) I bought black foamcore from a craft store along with sheets of moss.  I cut out my “M’s” and glued the moss to the foamcore and added a ribbon all for about $8.00.

03-MeghanMike-Details004-e1357270937149.jpg

To dress up the aisle of the church I made paper flower balls.  Much more affordable than fresh flowers.  I bought styrofoam balls and a ton of tissue paper. I made paper flowers and inserted them into the ball until it was full.  I added ribbon and hung them on every other pew in the church.  Total cost: $20.

03-MeghanMike-Details003-e1357426678356.jpg
03-MeghanMike-Details008-e1357271113161.jpg

We wanted to remember our loved ones who could not be with us at our wedding.  I bought 4 clear drinking glasses from the dollar store to act as vases.  I bought 4 sheets of vellum paper.  I took old vintage pictures of our loved ones, copied them onto paper, and then printed  text under the picture.  I taped the words under the picture and then copied the image onto the vellum paper.  I wrapped the paper around the glass, taped it, and then added a candle.  Total cost: $6.00.

02-MeghanMike-Ceremony040-e1357426845768.jpg

Getting married! ;)

02-MeghanMike-Ceremony128-e1357270275982.jpg

Married!

06-MeghanMike-MeghanMike001-e1357272588542.jpg

Four “M’s”.

07-MeghanMike-Reception003-e1357272793994.jpg

Our custom koozie was a last-minute addition, like a week before the wedding last-minute addition!  I went online and designed them.  The quote is one Mike always says when he does a shot with his friends and I thought we should put our names and our wedding date on it to remember the day.

We had these on our bus after the wedding while we took pictures.  Beer always makes people happy.  These ended up being the best idea ever because it was so freakin’ hot that our beers were majorly sweating.  The koozies protected mine and my bridesmaids’ dresses from getting dripped on.  I mean, we are classy ladies after all.

03-MeghanMike-Details025-e1357427022526.jpg

This is the large sign we made to cover up an ugly wall and to thank all of our guests for coming to our wedding.  We did not do any favors for our guests because typically a lot of money is put into these and most people don’t take them, and if they do, they throw them away.  My gift to my guests was top shelf liquor for 6 hours and pizza at 11:00pm.  This is much better than a bell with our names on it! :)

03-MeghanMike-Details033-e1357271622880.jpg

Large piece of foamcore board used as a seating chart.  We added actual frames to give the board some depth and to differentiate between different letters.

03-MeghanMike-Details024-e1357271346412.jpg

The ceiling where we got married was not cute.  I tried to add some visual interest by hanging these yarn balls from the ceiling over our center table.  We did three long rows of tables to give our reception more of a family style feel.  I made about 30 yarn balls!!!

03-MeghanMike-Details045-e1357273542729.jpg

I hate carnations.  Hate.  Hate.  Hate. I have honestly never been a fan of the flower.  When I was researching flowers and centerpiece ideas I started to realize flowers are EXPENSIVE!  I love flowers but was realistic that no one was going to remember my flowers, so why invest a lot of money in them?  While I was looking for affordable centerpiece ideas I found carnations bundled together.  I actually liked this idea.  What, me liking carnations?!? It happened. I placed a bulk order through a local garden center for 500 orange carnations. Total cost: $340.00.  My mom and I arranged these in white vases we had collected from thrift stores and spray painted white.  Total cost for 35 vases: ~$20.00.

I knew I wanted gray tablecloths and white napkins on my tables.  When I looked into renting them I soon found out it would not be cheap.  I was quoted over $1000 for what I wanted.  My mom was doing research and stumbled upon a website where you could buy tablecloths and napkins at an affordable price.  SCORE!!!!  I bought 32 gray, floor length tablecloths (that fit 8 foot tables) and 200 white napkins (both were polyester) for the total price of $320.00!  The shipping for my order was free.  After the wedding I turned around and sold most of the napkins and tablecloths for around ~$150.00.  So, my linens ended up costing me (essentially) $170.00.  Not bad if you ask me.

The chairs at our venue were not elegant at all.  I knew I did not want to invest in chair covers since people would only be sitting in the chairs for dinner (the dancing part of my reception was outside).  I wanted to do something to dress them up without spending a lot of money.  I came up with idea of tying ribbon over the tops of the chairs.  I paid $45.00 for 3 rolls of ribbon.  The sea of orange really popped against my gray table cloths.

03-MeghanMike-Details029-e1357271405229.jpg

Mike and I knew that even though we weren’t getting married in Chicago we still wanted to incorporate where we live.  We had pictures taken around Chicago and at places that were special to us.  We displayed these pictures down the center of the tables.  The pictures were in old frames we had collected and spray painted white.  We removed the backs of the frames because we wanted all of the backs to be white.  We covered the backs with white poster board.  All of the frames were held up with a fork that was made into a stand.

I also made paper flowers and sprinkled them down the center of the tables to add to the frames and flower pots.

03-MeghanMike-Details035-e1357429645922.jpg

To add some lighting to the center of the tables, we used homemade votives.  Mike collected clear wine and liquor bottles and my uncle cut them down.  Total cost: $0.

I made all of the table numbers from card stock and washi tape.  And, yes, I did make the white table number holders out of clay. :)

03-MeghanMike-Details032-e1357271539161.jpg
03-MeghanMike-Details059-e1357271956485.jpg

Instead of going the traditional route and doing just a three-tiered wedding cake we asked Mike’s mom to make her famous carrot cake for us as our wedding cake.  In addition to our cake, my aunts and Mike’s mom made different sweets for our sweets table. The cake stands were made out of white plates stacked on candle sticks that were spray painted white.  All of the supplies were bought at the thrift store.

03-MeghanMike-Details039-e1357427325394.jpg

This was the table for our wedding guest book.

03-MeghanMike-Details055-e1357271862832.jpg
03-MeghanMike-Details056-e1357271904764.jpg

I took a wood ampersand and decoupaged black and white pictures of Mike and I to put next to our wedding guest book.

03-MeghanMike-Details072-e1357272017360.jpg

I wanted a wedding guest book that did not scream “bridal”.  So, I got a Chicago photo book and had our guests write their wedding wishes in our book that we now have on our coffee table.

03-MeghanMike-Details095-e1357272140160.jpg

I knew one of the must haves at my wedding were flip-flips for the ladies.  We all know that after a night of dancing our feet start to hurt and a basket full of flip-flops is the best sight ever!  I bought about 40 pairs in different sizes from Old Navy in the winter.  I got a great deal on them because they were on sale.  I put the flip-flops next to the band on the dance floor so the ladies could kick off their heels and throw on some flip-flops without missing precious dance time.  Total cost: $42.00.

03-MeghanMike-Details112-e1357272188677.jpg

The minute I decided my colors were going to be orange and gray my mom starting buying anything and everything orange and gray!  I gave my mom a hard time about the orange glow in the dark bracelets, but at the last-minute decided to include them.  We even included a sign on how to use them. :) These were a huge hit!

limbo-e1357431271128.jpg

Another hit was the limbo stick!  My friends and I are always whipping out the “limbo stick” when we are out.  We’ve made a limbo stick out of a scarf and with our arms while holding hands.  So, it just made sense that we would have a limbo stick at our wedding.  I bought a broom from the dollar store, took the broom head off, and tied ribbon around it.  Total cost: $2.00.

limbo1-e1357431331677.jpg
07-MeghanMike-Reception063-e1357251445670.jpg

Cocktail hour and dancing were outside on the patio that overlooked the lake.  This made two areas I had to decorate!  My mom and I got old small popcorn tins, painted them gray, and planted orange marigolds in them.  We put these on some of the tables.  We put candles on the other tables.  We made some orange pillows for a bench, and hung some white paper lights.

07-MeghanMike-Reception075-e1357251359265.jpg

First dance!

06-MeghanMike-MeghanMike012-e1357272686138.jpg

In addition to doing all of my centerpieces, I also did my bouquet, Mike’s boutonniere, the groomsmens’ boutonnieres, my bridesmaids’ bouquets, and flowers for the mothers, fathers, and grandmothers.  I bought flowers through a local grocery store.  Total cost $150.

05-MeghanMike-BridalParty018-e1357272322396.jpg
05-MeghanMike-BridalParty041-e1357272488851.jpg

To keep things affordable and simple for our bridal party, I let my bridesmaids wear whatever short gray dress they wanted.  I also had the guys wear any black suit they had and we provided the ties as part of their gift.  I thought everyone looked great.  No tux rental here and if you can’t wear your dress again? Don’t blame me!

05-MeghanMike-BridalParty019-e1357272367190.jpg

I also let my bridesmaids wear whatever style and color of shoe they wanted.  I loved the kaleidoscope of color we had!

Group shot!

06-MeghanMike-MeghanMike006-e1357272643609.jpg
06-MeghanMike-MeghanMike051-e1357852869598.jpg
meghan quinonesComment
DIY Glitter Stud Earrings
glitter earring 2.jpg

I decided to ease in to sparkle and glitter.  I decided to make glitter earrings. 

Supplies: 

·         2 Buttons (preferably with a divot to hold the glitter) 

·         2 earring posts 

·         Mod Podge 

·         Pliers 

·         Super glue 

·         Paint brush (or Q-tip) 

Step 1: Cut the back off of your buttons.  I used pliers to do this.  

Step 2: Cut the back off of your other button.  

TIP: If the back of your button is not smooth, use a lighter to melt the button (if it is plastic) and then use your pliers to cut the excess off. 

Step 3: Take your paint brush (or Q-tip) dip it in your Mod Podge and fill the inside of your button with Mod Podge. 

Step 4: Fill your button with glitter. 

Step 5: Fill it all of the way to the top! Let the glue dry. 

TIP: I would wait 2 hours or so to make sure the glue is completely dry. 

Step 6:  Once the glue has dried, shake off the excess glitter. 

Step 7: Put super glue on the back of your earring post and glue to the back of the buttons. I would wait an hour or so to make sure the super glue is completely dry. 

Enjoy your new glitter earrings! 

glitter earring1.jpg
DIY New Sew Infinity Scarf

When I challenged myself to find a way to create an infinity scarf, without actually knitting one, I thought this was going to take some REAL creativity. 

I was at Joann’s hanging out, per usual, when I happened to spy some fabric in the sale section.  I do not usual look at fabric in the sale section because it is so hard to find anything, since fabric is stacked on top of one another (and I am not that patient).   This fabric was maroon and was a knit.  SCORE!!  The fabric was P-E-R-F-E-C-T!  I bought it and started my infinity scarf adventure. 

DSC_0101_edited-1.jpg

Supplies: 

  • 1 yard of a knit fabric (Boucle fabric should do the trick) 

  • Thread – make sure it matches your fabric 

  • Sewing needle 

  • Sewing Machine 

  • Scissors 

  • Straight pins 

Step 1: Take your fabric and fold in it half. You want to make sure the nice part of your fabric (i.e the good side of the fabric) is showing on the outside. 

Step 2: Take your fabric and fold it in half again.  You will want to pin all of the open sides. 

Step 3: After you have pinned your scarf, start sewing!  You will to start sewing at the upper right hand corner of your scarf.  Make sure you have enough of a seam allowance when you sew.  You will sew all the way around your scarf and will stop when you are 3.5 inches from the end. 

Step 4: After you sew your scarf, you will want to turn it right side out.  You will start pulling the fabric through the opening you left when you were sewing. 

Step 5: Keep pulling your fabric through the opening until all of your sewed ends are now “inside”. 

Step 6:  You will now need to sew the open section you left. 

Step 7:  Take the fabric of the open section and tuck it inside.  You will want nice finished edges.  After you have nicely tucked your fabric inside, pin it, and then sew it. 

Step 8:  Your scarf should look like my scarf below.  You are going to take the left side and fold it over to the right side and pin the edges together. 

Step 9:  You will start to do a whip stick to hand sew the ends of your scarf together.  Make your stitches close together.  You will go down your entire scarf until you get to the end. 

You are finished!  You now have an infinity scarf that looks knitted, but is not!  This was a gift for my friend Danielle. 

Thanks Danielle for modeling my finished product! 

DIY Custom Teacher Appreciation Shaker Card
teachershakercard

Give teachers a big “Thank You!” with this interactive DIY Custom Teacher Appreciation Shaker Card! 


card

After the year teachers have had, they deserve the biggest thanks for all of the handwork and dedication to their students.  It’s been such a crazy time and teachers haven’t missed a beat.  With the school year over, it’s time to show these special people how thankfully we are for everything they’ve done the entire school year, especially the last few months. 

Even though we can’t thank these teachers in person, we can still send something from the heart to show how much we care and to let them know they truly are rock stars!  This DIY Custom Teacher Appreciation Shaker Card is the perfect way to say “Thank You”. 

I designed the stamp for this DIY Custom Teacher Appreciation Shaker Card on Rubberstamps.com.  They have numerous stamp designs to choose from on their site, but they also offer a custom stamp service.  It’s so cool, especially if you want to create stamps for your business or even a special event like a wedding.  

Check out the full video tutorial below to see how you can create your own DIY Custom Teacher Appreciation Shaker Card using a custom stamp from Rubberstamps.com

Supplies: 

  • Acrylic Block 

  • White Cardstock 

  • Solid Cardstock 

  • Patterned Cardstock 

  • Transparency Sheet 

  • Star Template 

  • Scissors 

  • Foam Squares 

  • Large Glitter 

  • Tape Runner 

  • Cutting Mat 

  • Craft Knife 

  • Pencil 

  • Scissors

Step 1: To create a custom stamp, go to rubberstamps.com, select “Custom Stamps” and filter by “Clear Stamps”.  Then, select the 2”x4” stamp.  Click on “Personalize” and then click “Graphics”–”Add New Graphic”–”Browse”.  Upload your graphic and resize to fit the space. Once you have the right size, add it to you cart to purchase. 


Step 2: Cut a piece of 8.5”x11” white cardstock in half.  Cut a piece of 5.25” x 4.125” solid cardstock and a piece of patterned paper 5.125”x4”. 


Step 3: Either draw a star shape or find a template online.  You’ll want the star shape to be 3.25”.  


Step 4:  Flip your patterned paper over and place the star on the upper right-hand corner, trace it, and use a craft knife (on top of a cutting mat) to cut out the star shape. 


Step 5:  Flip your patterned paper over and center it on top of the colored cardstrock. 


Step 6: Lightly trace the inside of the star. 


Step 7: Cut a strip foam squares in half.  Then, peel off the back liner and place them around the outside of the traced star about 1/8” from the pencil mark. 


Step 8: When you’re done, erase the pencil marks and shake of the shavings. 


Step 9: Add glitter to the inside of the star shape. 


Step 10: Then, peel of the top liner of all the foam squares. 


Step 11: Cut a piece of transparency film 5.125”X4” and place it on top of the foam squares. 


Step 12: Add glue to the back of the star cutout cardstock and glue it on top of the transparency film. 


Step 13: Fold the white cardstock in half (this will create your cardbase). Then, glue the other piece of cardstock on top. 


Step 14:  Grab your custom Rubberstamps.com stamp, place it on an acrylic block, and add ink. 


Step 15: Stamp a piece of 5.125”X4” white cardstock and then cut it out to a banner shape. 


Step 16: Add foam squares to the back and place on the bottom of the card. 


Once your DIY Custom Teacher Appreciation Card is finished, don’t forget to toss in a little something extra like a gift card to show the teacher(s) in your life how gratefully you are for them and all of their hard work the entire school year! 

meghan quinones