My Wedding: 7.7.12
Mike and I got married on July 7, 2012. The day was seriously awesome! I know everyone says that, but we were surrounded by all of our family and friends, the booze was flowing and the music was amazing. How could it NOT be the best night ever?!
Being the thrifty person I am when I got engaged I knew I would try my hardest to keep things affordable and unique. I knew I was going to be a “Budget Bride”. Mike and I are not cookie cutter and we did not want a wedding that was. We planned our wedding as a party that celebrated us. We kept some of the wedding traditions and got rid of others. If we didn’t want to do something, we didn’t do it.
My challenge was to keep things affordable and to craft my face off! Which, if you look at my wedding pictures below you will see I did just that. It was so satisfying to know I had come up with our wedding vision and had executed it on a dime. Seeing everything come together on our wedding day was awesome!
From the very beginning Mike and I knew we wanted to put the bulk of our wedding funds towards our honeymoon. We wanted this to be an amazing bucket list trip, an experience we both would never forget. By doing our wedding on a budget, we were able to do just that. Having saved some serious cash on our wedding, we were able to fly around Thailand (Bangkok, Chiang Mai, Koh Samui, Koh Pha Ngan, and Koh Tao) for 14 days with no budget, which meant 5 star lodging. Our honeymoon cost more than our reception!
Check out all of my wedding CIYs below to see how I was able to pull off a budget friendly wedding!

These were the two dresses I wore at my wedding. I decided to have two dresses because I knew my wedding day was going to be hot (I wasn’t expecting 102 degrees!) and wanted to be cool for the dancing part of my reception. We had a live band and I knew I was going to dance my butt off. No one wants to see a sweaty bride! ;)

I bought my long dress in New York at RK Bridal. My mom and I took a special trip to NY so I could try on the sample. It was such an awesome trip and I get to feel fancy when I tell people I bought my wedding dress in NY. When I tell you how much I spent on my dress you are going to fall out of your chair. My dress was by Jim Hjlem, but the kicker is…it’s actually a bridesmaid dress that came in ivory! So, my long dress ended up costing me $225.00 (and that’s with shipping!).
My short dress was from Nordstrom. It was a Taylor Dress. This little number set me back $170.00.
So, my trip to NYC, my long dress, and my short dress ended up costing about $500.00 less than the average bride spends on one dress! Proud of my thriftiness? You bet!


I had two pairs of shoes, one pair for my long dress and another pair for my short dress. I created the jeweled “shoe pops”, as I like to call them. These were actually brooches I bought from a craft store. They matched my gun metal accessory theme perfectly. I took the pin off of the back and glued on an alligator clip so I could clip them to my shoes.
I also refashioned the purse. I bought an ugly white bridal purse from a craft store for $7.00 along with some gray silky fabric. I cut strips of silk and cut out notches so it kind of looked like leaves. I then made a ruffle out of my strips and then glued them to the top of my purse.


These were the shoes I wore with my long dress. They were pretty ugly when I bought them. They were on sale for $17.00. I figured if I ruined them from attempting an alteration, no big deal since they were so cheap.
When I got them they had crisscross leather straps over the toes and a strap going from the top of the shoes up to the ankle strap. I cut off some of the toe straps, the middle strap, and the strap that went around the ankle. I bought some orange silk fabric, made a bow, and glued it to the straps over the toes.


This is the bracelet I wore for my wedding. I made it from beads I ordered from China. I made three strands of beads and just braided them together. This looks like it would be heavy, but it is very light. Like I said, the beads were from China, so they were made out of the cheapest material on Earth. Total cost of bracelet ~$7.00.


When I made the executive decision to wear my short, bobbed hair up in a crazy teased pompadour, I knew I needed something fancy for the back. I used my gun metal beads and just wire wrapped them making “trees”. I then wired my “trees” onto a hair comb.
I also made my earrings. I used the same beads from China to make these super easy cluster drop earrings. Once again, they were very light on my ears. :)
I had gone to a couple of local salons for a make-up trial, but was far from pleased with what I got. I wanted to look like the best version of myself, but got a super dark-eyed, unrecognizable me! It was at that point I decided I would do my own make-up. I mean, I was doing everything else, why not add make-up to my list of to-dos?
I went to the Bobbi Brown make-up counter for a free make-up application. I ended up loving the look, and did I mention this was FREE???? I bought all of the make-up that had been used on me. As the months went by I bought up Bobbi Brown brushes to help me master my look. I spent hours watching Bobbi Brown online tutorials and applying and removing false eyelashes. On the day of my wedding I was so relaxed while putting my make-up on because it was now part of my normal routine. I am so happy that I decided to drop around $200 on make-up that I was able to use for months, as opposed to a one-time wedding day make-up application. :)


My gift to my bridesmaids was their jewelry (which I made), flips flops (one thing I DID NOT make :D), and tote. I made the tote out of felt. I found cute orange flower fabric that looked like it could be from Anthropologie. I cut out the flowers from the fabric and used wonder under to glue the flower fabric to the felt bags I made.


In an effort to keep costs down, I decided to design all of my stationary. What I did was take a 8.5 x 11 sheet of paper and design all of my invitation items from this one sheet of paper. My invitation was 5×7 and the response card was the proper size for a postcard, which meant cheaper postage! I designed and created all of my stationary in publisher. I sent my one page PDF to a printing company who printed and cut my stationary. I bought my envelopes from a store when I was in NY and had a custom stamp made with our return address. Total cost for wedding stationary, postage to send, and return postage: ~$375.00.


I designed and printed my wedding programs as well. I bought my own card stock from a craft store for $2.99 and was able to get 3 programs per page. I cut out each program, folded it in half, and tied a string on it.

This is a bridal hanger my mom made for me! She is also VERY crafty and helped with a large portion of my wedding craftiness.

I decided the door of the church needed a little pizzaz so I decided to make two “M’s” for “Mike and Meghan”. :) I bought black foamcore from a craft store along with sheets of moss. I cut out my “M’s” and glued the moss to the foamcore and added a ribbon all for about $8.00.

To dress up the aisle of the church I made paper flower balls. Much more affordable than fresh flowers. I bought styrofoam balls and a ton of tissue paper. I made paper flowers and inserted them into the ball until it was full. I added ribbon and hung them on every other pew in the church. Total cost: $20.


We wanted to remember our loved ones who could not be with us at our wedding. I bought 4 clear drinking glasses from the dollar store to act as vases. I bought 4 sheets of vellum paper. I took old vintage pictures of our loved ones, copied them onto paper, and then printed text under the picture. I taped the words under the picture and then copied the image onto the vellum paper. I wrapped the paper around the glass, taped it, and then added a candle. Total cost: $6.00.

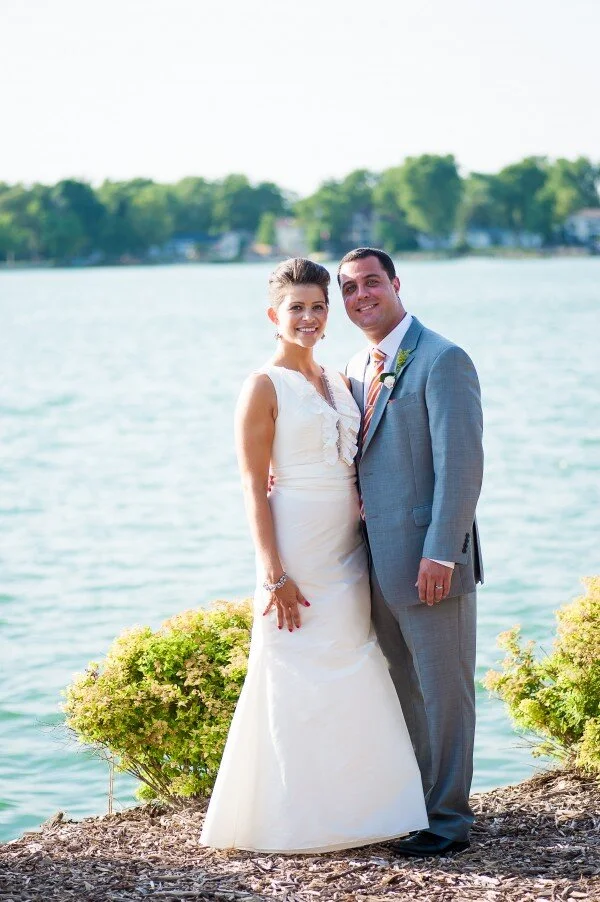
Getting married! ;)

Married!

Four “M’s”.

Our custom koozie was a last-minute addition, like a week before the wedding last-minute addition! I went online and designed them. The quote is one Mike always says when he does a shot with his friends and I thought we should put our names and our wedding date on it to remember the day.
We had these on our bus after the wedding while we took pictures. Beer always makes people happy. These ended up being the best idea ever because it was so freakin’ hot that our beers were majorly sweating. The koozies protected mine and my bridesmaids’ dresses from getting dripped on. I mean, we are classy ladies after all.

This is the large sign we made to cover up an ugly wall and to thank all of our guests for coming to our wedding. We did not do any favors for our guests because typically a lot of money is put into these and most people don’t take them, and if they do, they throw them away. My gift to my guests was top shelf liquor for 6 hours and pizza at 11:00pm. This is much better than a bell with our names on it! :)

Large piece of foamcore board used as a seating chart. We added actual frames to give the board some depth and to differentiate between different letters.

The ceiling where we got married was not cute. I tried to add some visual interest by hanging these yarn balls from the ceiling over our center table. We did three long rows of tables to give our reception more of a family style feel. I made about 30 yarn balls!!!

I hate carnations. Hate. Hate. Hate. I have honestly never been a fan of the flower. When I was researching flowers and centerpiece ideas I started to realize flowers are EXPENSIVE! I love flowers but was realistic that no one was going to remember my flowers, so why invest a lot of money in them? While I was looking for affordable centerpiece ideas I found carnations bundled together. I actually liked this idea. What, me liking carnations?!? It happened. I placed a bulk order through a local garden center for 500 orange carnations. Total cost: $340.00. My mom and I arranged these in white vases we had collected from thrift stores and spray painted white. Total cost for 35 vases: ~$20.00.
I knew I wanted gray tablecloths and white napkins on my tables. When I looked into renting them I soon found out it would not be cheap. I was quoted over $1000 for what I wanted. My mom was doing research and stumbled upon a website where you could buy tablecloths and napkins at an affordable price. SCORE!!!! I bought 32 gray, floor length tablecloths (that fit 8 foot tables) and 200 white napkins (both were polyester) for the total price of $320.00! The shipping for my order was free. After the wedding I turned around and sold most of the napkins and tablecloths for around ~$150.00. So, my linens ended up costing me (essentially) $170.00. Not bad if you ask me.

The chairs at our venue were not elegant at all. I knew I did not want to invest in chair covers since people would only be sitting in the chairs for dinner (the dancing part of my reception was outside). I wanted to do something to dress them up without spending a lot of money. I came up with idea of tying ribbon over the tops of the chairs. I paid $45.00 for 3 rolls of ribbon. The sea of orange really popped against my gray table cloths.

Mike and I knew that even though we weren’t getting married in Chicago we still wanted to incorporate where we live. We had pictures taken around Chicago and at places that were special to us. We displayed these pictures down the center of the tables. The pictures were in old frames we had collected and spray painted white. We removed the backs of the frames because we wanted all of the backs to be white. We covered the backs with white poster board. All of the frames were held up with a fork that was made into a stand.
I also made paper flowers and sprinkled them down the center of the tables to add to the frames and flower pots.

To add some lighting to the center of the tables, we used homemade votives. Mike collected clear wine and liquor bottles and my uncle cut them down. Total cost: $0.
I made all of the table numbers from card stock and washi tape. And, yes, I did make the white table number holders out of clay. :)


Instead of going the traditional route and doing just a three-tiered wedding cake we asked Mike’s mom to make her famous carrot cake for us as our wedding cake. In addition to our cake, my aunts and Mike’s mom made different sweets for our sweets table. The cake stands were made out of white plates stacked on candle sticks that were spray painted white. All of the supplies were bought at the thrift store.

This was the table for our wedding guest book.


I took a wood ampersand and decoupaged black and white pictures of Mike and I to put next to our wedding guest book.

I wanted a wedding guest book that did not scream “bridal”. So, I got a Chicago photo book and had our guests write their wedding wishes in our book that we now have on our coffee table.

I knew one of the must haves at my wedding were flip-flips for the ladies. We all know that after a night of dancing our feet start to hurt and a basket full of flip-flops is the best sight ever! I bought about 40 pairs in different sizes from Old Navy in the winter. I got a great deal on them because they were on sale. I put the flip-flops next to the band on the dance floor so the ladies could kick off their heels and throw on some flip-flops without missing precious dance time. Total cost: $42.00.
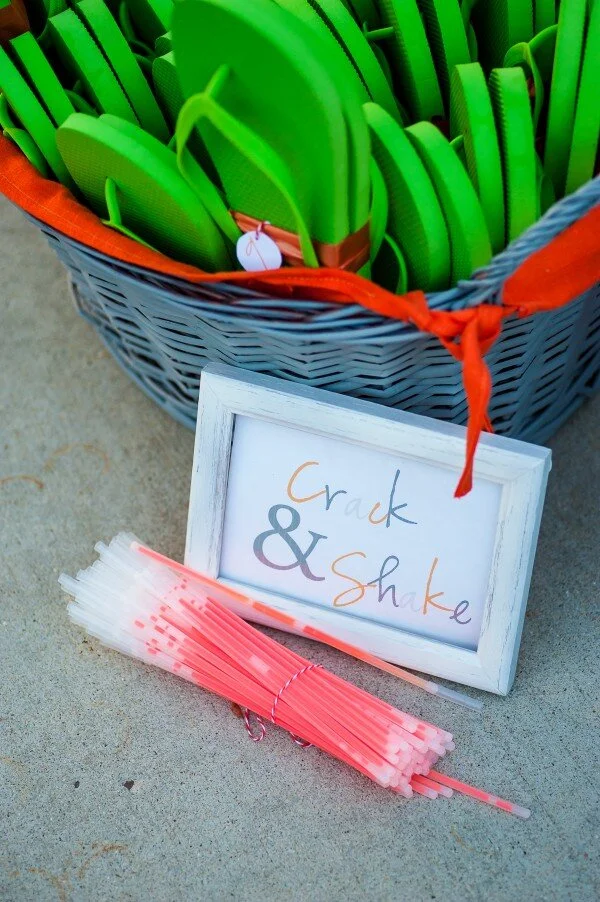
The minute I decided my colors were going to be orange and gray my mom starting buying anything and everything orange and gray! I gave my mom a hard time about the orange glow in the dark bracelets, but at the last-minute decided to include them. We even included a sign on how to use them. :) These were a huge hit!

Another hit was the limbo stick! My friends and I are always whipping out the “limbo stick” when we are out. We’ve made a limbo stick out of a scarf and with our arms while holding hands. So, it just made sense that we would have a limbo stick at our wedding. I bought a broom from the dollar store, took the broom head off, and tied ribbon around it. Total cost: $2.00.


Cocktail hour and dancing were outside on the patio that overlooked the lake. This made two areas I had to decorate! My mom and I got old small popcorn tins, painted them gray, and planted orange marigolds in them. We put these on some of the tables. We put candles on the other tables. We made some orange pillows for a bench, and hung some white paper lights.

First dance!

In addition to doing all of my centerpieces, I also did my bouquet, Mike’s boutonniere, the groomsmens’ boutonnieres, my bridesmaids’ bouquets, and flowers for the mothers, fathers, and grandmothers. I bought flowers through a local grocery store. Total cost $150.


To keep things affordable and simple for our bridal party, I let my bridesmaids wear whatever short gray dress they wanted. I also had the guys wear any black suit they had and we provided the ties as part of their gift. I thought everyone looked great. No tux rental here and if you can’t wear your dress again? Don’t blame me!
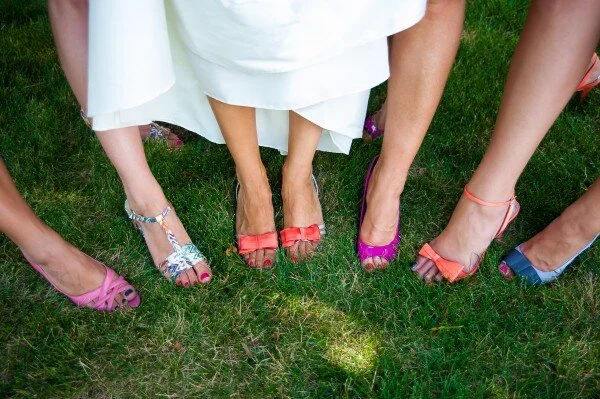
I also let my bridesmaids wear whatever style and color of shoe they wanted. I loved the kaleidoscope of color we had!

Group shot!