Make a DIY Rope Necklace Out of Trim
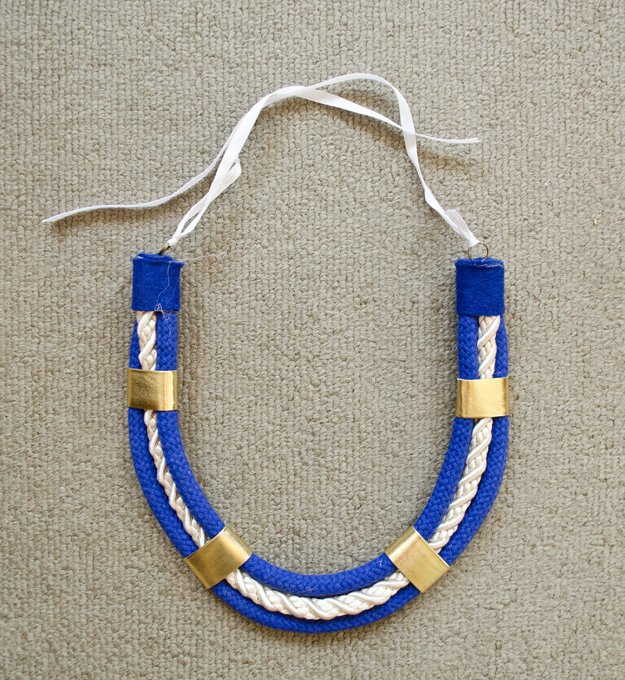
Well, here it is…My boat rope necklace!
I did not have access to boat rope (once again, I am a boat guest, not a boat owner) to make my necklace. So, I found some rope at Joann’s that had a similar look and feel to it. I believe real metal is used in my inspiration to hold the ropes together. Once again, I did not have this so I did my best to use something that looked kinda, sorta similar. P.S. My boat rope necklace is MUCH, MUCH, cheaper than my $300+ and $400+ inspiration necklaces!
Supplies:
– 1 yard of thick rope (I got blue from Joann’s in the trim section)
– 1/2 yard of thick rope (I got a cream color from Joann’s in the trim section)
– 1/8 yard of 1 and 1/2 inch thick gold plastic trim (this is something you would use to make a belt)
– Small piece of felt
– 2 5mm jump rings
– 1/2 yard of ribbon
– Scissors
– Thread
– Needle
– Glue gun with glue
– Clear tape
{Step 1}: Take your yard of rope (mine is blue) and cut it in half. Take your tape and wrap it around all ends of your 2 ropes. This will prevent your rope from fraying.
{Step 2}: Take one of your cut pieces of rope and lay it on your table so it is curved, with the ends at the top. Lay your smaller piece of rope (in my case, this was my cream-colored rope) over the rope you just placed on your table. Put one end of your rope next to the end of your first rope. Cut the other end of your second rope so it is even with the other end of your first rope. Take your tape and wrap it around both ends of the rope you just cut.
{Step 3}: Take the other half of the rope you cut and lay it so it is over your second rope. Once again, put one end of your top rope next to the end of your second rope. Then line up the other end and cut. Take your tape and wrap it around both ends of the rope you just cut.
{Step 4}: Take your gold trim and cut it down the center so you have two pieces.
{Step 5}: Then, cut your two strips in half (in the middle) so you have four pieces of gold trim.
{Step 6}: Take your four gold trims and lay them under your rope so the nice side of each trim is facing down.
{Step 7}: Fold over one end of your trim and put gun on the end of your trim. Fold the ends together to glue your gold trim together. Repeat this for all four trims.
{Step 8}: Cut your felt so it is an inch tall.
{Step 9}: Then, cut your felt so it is two and a half inches wide. Use your piece of felt to cut another piece the same size.
{Step 10}: Grab one end of your necklace and take all three ropes and wrap tape around them to secure them together. Repeat this step on the other end of your necklace.
{Step 11}: Put glue on your felt and wrap it around one end of your necklace so the top of your felt is level with the top of your necklace. Repeat this step on the other end of your necklace.
{Step 12}: Take your extra felt and cut out a circle that will fit over the top end of your necklace. Repeat this step with the other end of your necklace.
{Step 13}: Take your jump rings and sew one ring on the top center of each of your two felt circles.
{Step 14}: Put glue all over the top exposed ropes and glue your felt circle to the top of your necklace with the jump ring facing out. Repeat this step to the other side of your necklace. Tie your ribbon to your jump rings. You are finished!


