Untitled-3.jpg

Blog

DIY Bat Candle Holder

I have one more fun Halloween project for the season (nothing like waiting until the last minute to post this!).  This DIY bat candle holder is a fun twist on lighting up your mantle, shelf, or walkway this Halloween.  It’s also the perfect project for glass jar hoarders and those that love a good upcycle!

My kids had finished yet another jar of peanut butter from Trader Joe’s I was rinsing it out so I could put in in the recycling pile when I noticed what a nice jar it was.  You guys, it was smooth with no weird decorative swirls or odd seams – it was such a nice simple jar!  I know this might sound weird, but I think it’s hard to find a glass jar that has a simple style.  Since I was clearly in love with this jar, I wanted to try and use it for a project.

I grabbed some extra adhesive vinyl I had and cut out small bats.  Now, it you have a Cricut or Silhouette, bravo to you because you can literally finish this project in like 10 minutes.  If you are like me and do not have one find a bat template from the good old internet, print out the image, trace it on top of your vinyl, and cut it out.

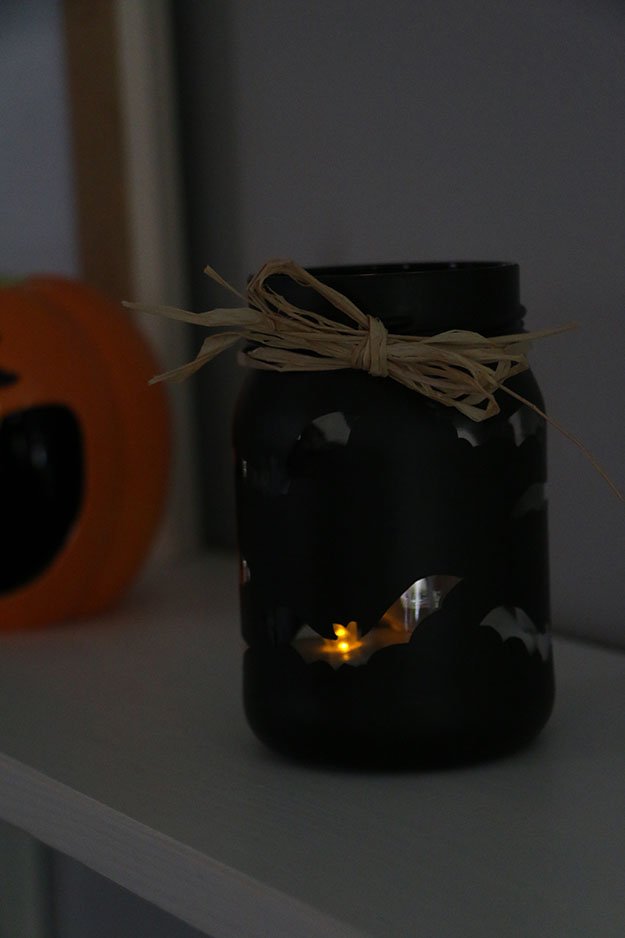
Once you have all of your bats cut, arrange them on your jar.  Then, hit the jar with black matte spray paint and let dry.  You’ll want to do two coats of paint.  After your paint has dried, slowly peel off the vinyl bats – you may need to use tweezers to get them off.  That’s it!  For extra detail, I wrapped the top of my jar with raffia.  Plop in a battery operated candle or a real one for a super cool and bat candle holder!

You can see the spooky bats shining through!

meghan quinonesComment
DIY Mini Felt Pumpkin Tote

This DIY mini felt pumpkin tote is just what your little tot needs to store all of their coveted candy on Halloween!

I am a huge fan of Fall.  I love when the seasons change, especially when we go from Summer to Fall.  This transition brings cooler temperatures and beautiful foliage.  Fall also brings Halloween, which is one of my favorite holidays! I love crafting up projects for this spooky holiday.

Since this is the first year Tommy and Evie are able to actively participate in Halloween, I wanted to make them a cute mini felt pumpkin tote.  Let’s be real, they don’t need a huge tote for trick-or-treating since they’ll probably lose interest in the activity after 5 minutes. So, this mini tote is the perfect size for their little hands to hold and carry around.  See the full tutorial on DIYs.com!

meghan quinonesComment
DIY Skunk Sweatshirt Costume

Halloween has always been a time for crafting.  Every year my mom would make costumes for my brother and I since she was about to drop cash on flimsy plastic costumes that we were going to use for just one night. She would take time to make us a costume usually made out of felt and 100% amazing!

As I’ve gotten older I too have made all of my Halloween costumes.  I was really into coming up with unique creations in college.  While other girls were basically wearing a bra and underwear along with a hat and handcuffs for their police officer costumes, I was busy painting my face gray and adding stuffing to a gray sweatshirt for my manatee costume.  I mean, Halloween is typically cool – the more clothes the better, right?

Now that I have kids I knew I wanted to continue the DIY costume tradition.  I was super busy last year working full-time and running around like a maniac taking care of  Tommy and Evie that I just didn’t have the time to make their Halloween costumes.  So, I enlisted my mom’s help to create adorable little crayon costumes for them since she had made the same costume for my brother and I like 30+ years ago!  Man, they turned out so cute.

My life has calmed down a bit since last year now that my kids are older and I’m not working full-time.  So, I decided to get a head start on their costumes.  I was going to go the fruit route and make Evie a pineapple since I have a slight obsession with pineapples and Tommy a kiwi.  I ended up going in a different direction.  I had remember my mother-in-law showing me 6 month old twins dressed up as skunks.  At that age they looked more skunk-like since they were crawling, but I figured walking skunks would be just as cute! I found a skunk costume on Pottery Barn Kids for $59.99.  Umm…No!  I can’t image paying $120 for 2 Halloween costumes – INSANE!!!  I used the Pottery Barn version as my inspiration and was able to make my own version of the skunk costume for about $15.00 each.  Thank goodness for faux fur and hot glue guns!

Check out my full tutorial below! ***Sorry for all of the blurry pictures-my skunks are very active!***

Supplies:

  • Black hooded sweatshirt

  • Black leggings

  • 2 Sheets of White Felt

  • 1/4 Yard Black Fleece

  • Hot Glue Gun and Glue

  • Thick Floral Wire

  • Poly-Fil

  • Pink and White Polka Dot Felt (optional – this is for a girl skunk :D)

  • White Faux Fur Trim

  • Scissors

  • Black Thread

  • Needle

1. Cut a tail out of your fleece.  Make the tail about 4 inches wide and the length from the top of your sweatshirt to the bottom.  Round the end. Cut two tails.  You’ll also cut out two ears (four pieces total – 2 pieces for each ear). Cut two pieces of white felt with the same shape but smaller so they will fit inside of your ears.

2. Add fur to your sweatshirt.  My fur came in a large square. So, I cut it in half which was the perfect size. **NOTE** Make sure your fur is going down. Also make sure when you add another piece of fur it’s going in the same direction.  Add hot glue to the end of your fur and start by adding it to the front of your hood.  You’ll keep adding glue, working your way to the back of the hood.  You’ll then take another piece of trim (if yours is not long enough) and glue it so it is up against your last piece.  The fur from the first piece should cover the seam.

3. Add glue to the outer edge of your ears to glue them together. Flip them so the seam is on the inside.  Next, glue the white pieces of felt to the both ears. Then, fill each ear with Poly-Fil and sew the bottom together.

4. Sew (or glue) your two tail pieces together, leaving the bottom (non-curved side) open.  Turn the tail right side out and glue your fur trim to the top.  Trim the fur at the end of the tail so it’s rounded. Next, add Poly-Fil.  Cut a piece of floral wire the length of the tail and insert it inside.  Finally, sew the bottom of the tail shut.

5. Glue the tail to the back of the sweatshirt. You will start at the bottom adding glue and work your way up about half way.  Add glue to the bottom of your ears and secure them to the middle of the hood with one one each side of the fur trim. If you want a bow, make one out of the pink felt and glue it to one of the ears.

6. Cut a large oval out of your white felt.  Cut the oval in half and glue one half on each side of the zipper.

DONE!  Just pair the hoodie with a pair of black pants and add a black dot to your child’s nose and they are all set to be skunky!!!

I am super happy with how my little DIY  skunk costume turned out.  I think my version is a great alternative to my inspiration from Pottery Barn Kids.  So, if your running out of time to make your kiddos a costume for Halloween, this DIY skunk costume is perfect.  Gran your trusty glue gun, a glass of wine and get crafting!

meghan quinonesComment
DIY Pumpkin Rosette Garland

Bring your love of rosettes and pumpkins together with this DIY rosette pumpkin garland! Decorating for Halloween is an activity I look forward to all year long.  I love everything about Halloween, especially pumpkins. These little gourds are pretty displayed untouched, however, they look even better when they are decorated with a spooky face.

Since pumpkins have a simple shape, they are easy to incorporate into projects.  I decided to combine the ever-popular pinwheel with a pumpkin to create cute mini pinwheel pumpkin garland! This project is super simple to construct. Since it only requires paper, it’s also a budget friendly project to make!

Head on over to DIYs.com to see how this pinwheel pumpkin garland came together.  It’s the perfect addition to your Halloween party decor!

meghan quinonesComment

Here in Chicago we now have a bag tax.  This means every time I go to the store and I need a bag, the store has to charge me $0.07 for each bag I need.  Insane, right????  I pretty much ALWAYS forget to grab a bag when I go out shopping.  When the cashier asks if I need a bag, and I have to tell him/her “yes”, it pains me every.single.time.

I usually attempt to avoid the bag tax by juggling all of my purchased items in my arms, which is a huge pain in the butt.  I act like Wonder Women, because you know, I’m a mom of 18 month old twins so I can handle at least 40 pounds of weight. No problem, right?

Since the grocery juggling act is getting a bit old, I figured it was time for me to have a bag I can keep in my car so I always have one handy.  I wanted this to be cute; It couldn’t be just any old tote.  I, of course, went with a pineapple theme. I used a pom-pom maker to create the cutest little 3-D pom-pom pineapple.  Man, I love pom-pom makers!

Supplies:

  • Pom Pom Maker

  • Yellow Yarn

  • Rose Gold Iron-on Vinyl

  • Scissors

  • Tote Bag

  • Green Felt

  • Iron

  • Hot Glue Gun and Glue

Step 1: Open one arm of your pom pom maker. Wrap a piece of yarn along the curve starting on the left side, working your way towards the right side.

Step 2: When you get to the right, fold the arm back in place. Open the other arm of your pom pom maker. Run your working yarn over to the other arm. Wrap yarn around the arm moving to the right. When you get to the right, close the arm and snip your yarn.

Step 3: Cut down the center line of your pom pom maker. Repeat this step on the other side.

Step 4: Cut a piece of yarn and run it under the center of your pom maker. Tie a knot, making sure to pull your yarn tight.

Step 5: Open one arm, then the other.

Step 6: Pull the two sides of the pom maker apart.

Step 7: Trim any loose pieces of yarn. If you need to shape your pom, just give it a haircut. :) Repeat these Steps to make your other pom poms.

Step 8: Take the end of your yarn and run it from the bottom of your marker towards the cap. Begin wrapping your yarn around your marker moving down your marker.

Step 9. When you are at the bottom, tie your two pieces of yarn together and trim the ends.

You can see the full tutorial on DIYs.com.

meghan quinonesComment
DIY Pineapple Tote Bag

Here in Chicago we now have a bag tax.  This means every time I go to the store and I need a bag, the store has to charge me $0.07 for each bag I need.  Insane, right????  I pretty much ALWAYS forget to grab a bag when I go out shopping.  When the cashier asks if I need a bag, and I have to tell him/her “yes”, it pains me every.single.time.

I usually attempt to avoid the bag tax by juggling all of my purchased items in my arms, which is a huge pain in the butt.  I act like Wonder Women, because you know, I’m a mom of 18 month old twins so I can handle at least 40 pounds of weight. No problem, right?

Since the grocery juggling act is getting a bit old, I figured it was time for me to have a bag I can keep in my car so I always have one handy.  I wanted this to be cute; It couldn’t be just any old tote.  I, of course, went with a pineapple theme. I used a pom-pom maker to create the cutest little 3-D pom-pom pineapple.  Man, I love pom-pom makers!

Supplies:

  • Pom Pom Maker

  • Yellow Yarn

  • Rose Gold Iron-on Vinyl

  • Scissors

  • Tote Bag

  • Green Felt

  • Iron

  • Hot Glue Gun and Glue

Step 1: Open one arm of your pom pom maker. Wrap a piece of yarn along the curve starting on the left side, working your way towards the right side.

Step 2: When you get to the right, fold the arm back in place. Open the other arm of your pom pom maker. Run your working yarn over to the other arm. Wrap yarn around the arm moving to the right. When you get to the right, close the arm and snip your yarn.

Step 3: Cut down the center line of your pom pom maker. Repeat this step on the other side.

Step 4: Cut a piece of yarn and run it under the center of your pom maker. Tie a knot, making sure to pull your yarn tight.

Step 5: Open one arm, then the other.

Step 6: Pull the two sides of the pom maker apart.

Step 7: Trim any loose pieces of yarn. If you need to shape your pom, just give it a haircut. :) Repeat these Steps to make your other pom poms.

Step 8: Take the end of your yarn and run it from the bottom of your marker towards the cap. Begin wrapping your yarn around your marker moving down your marker.

Step 9. When you are at the bottom, tie your two pieces of yarn together and trim the ends.

You can see the full tutorial on DIYs.com.

meghan quinonesComment
How to Sew a Simple Tank Top

When I am at the fabric store, I tend to walk out with extra fabric that was not on my “list” of items to buy.  It’s so hard to stay focused on the task at hand when you are surrounded by so many pretty fabric patterns. I, of course, find myself touching all of the brightly colored bolts of fabric I walk past!

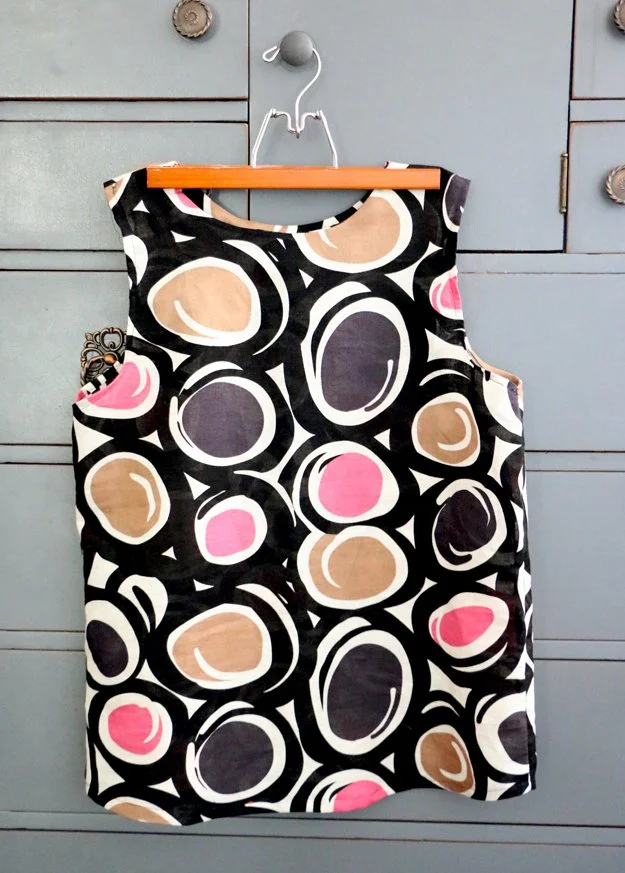
Probably two years ago (maybe even longer!), I picked up this really cool swirly dot linen style fabric.  My initial plan when I saw it was to turn it into a light-weight scarf. I thought the colors and pattern would make it a statement piece.  Well, my fabric has stayed in a drawer completely untouched for the last two years!  I was rummaging through my fabric bin a couple of months ago and decided it was time to use this fabric for a project and turn it into something pretty and useful.

I bought a tank top a while back from J.Crew that had the best shape. It had a high neck and was fitted towards the topped and flared a bit at the bottom.  I decided to use this top (along with my fabric I had been hoarding) and make fun, colorful tank top!

Here’s what you’ll need:

  • Tank Top (to use as your template)

  • Fabric (I already had a yard of fabric in my stash, but you could use less)

  • Pins

  • Scissors

  • Sewing Machine

  • Thread

Step 1:  Take your fabric and fold it in half.  Then, lay your tank top on top of your fabric. Pin it to your fabric to help keep it in place.

Step 2: Cut around your tank top, keeping 1/4 inch seam allowance around the edge of your top.  Since you folded your fabric in half, you will have two pieces cut. :)  After I cut out the main shape of my tank top, I folded my fabric in half and placed half of the collar interface along the fold.  I did this so both the front and the back of my interface were the same.

Step 3: You will want to fold the arm holes of your tank top in twice so you have a nice finished edge.  I pressed my arm holes with an iron to get a nice clean finish, then I placed a pin in it to make sewing easier.  You will repeat this step on both of your arm holes.

Step 3:  After you stitch down both edges on your arm holes, you will pin the sides of your tank top together.  Take both the front and back of your tank top and place them so the right sides of the fabric are facing each other.  Next, pin down the sides of your tank top to secure your fabric in place.  Then, sew the sides of your tank top.

Step 5: I took the interface for my tank top and fold in the edges all around it to finish it. Then, I flipped my tank top so it was right side out and turn my interface so the pattern was facing inward. I pinned the top of my interface to the top of my tank top. Once everything was all pinned in, I sewed around the top of my tank top.  After I was done with the sewing, I folded my interfacing in so it was inside of my tank top.  Then, I sewed around the top of my tank top to help keep my interfacing from popping out.

That’s it!  I am super happy with how my DIY tank top turned out.  I am also super excited that I was finally able to use the fabric I had been holding onto for a project that can be worn for years to come!

meghan quinonesComment
DIY Metal Air Plant Stand

When I first heard of air plants I thought they were fake.  How could a plant survive off of just air?!?! I mean, a plant that you don’t put in dirt and doesn’t need water – surely this is a dream plant for those of us whose green thumbs  are a bit challenged.  Am I right?  Well, as it turns out, air plants are real and do require water.  Even though they are not maintenance free, I thought this would be a plant even I could handle.

Air plants are a super trendy plant.  If you’re cool, you have an air plant in your space.  I think what’s so great about these little guys is you can get super creative with the type of vessel they are housed in.  Since they aren’t required to be anchored in dirt, you really can get creative with how you display them. I think this is why air plants really appeal to creative types – we can think outside of the box by placing them in terrarium or showcasing them in a metal sculpture hung on the wall.  There are so many different ways to display air plants!

I took a trip to the nursery to purchase my very own air plants.  Once I got the air plants, they spent a couple of weeks just chillin’ on my windowsill while I decided what kind of plant stand to make.  I found some really cool ideas, but loved one I saw at  West Elm.  The idea was simple and looked super easy to create.  Since I’m always on a mission to create the “look for less”, I went to the Dollar Store and bought a metal pan.  You know, one that you would bake lasagna in and take to a potluck?  Yeah, one of those.  The metal was sturdy enough to hold my lightweight air plants, but pliable that I could bend it with my fingers – no special tools required!

Supplies:

– Metal Baking Dish (I got mine from the Dollar Store)

– Gold Metallic Spray Paint

– Scissors

Air Plant Template

Here’s how to create your own DIY Metal Air Plant Stand:

1. Cut out the center of the metal tray.  Then, cut out the air plant templates and lay them on the tray.

2. Cut around the templates.

3. Cut out points on all 3 ends of the stand – this will help hold the air plant in place.

4. Add 2 coats of spray paint to both sides of the metal stand. Let the paint dry in-between applications.

5. Once the paint is dry, use your finger to fold the prongs up.  You’ll be able to play with these so they are in the right position to support your air plant.

6. Add your air plant!

This DIY was SUPER cheap to create and I think the end result is chic and sophisticated. You can make a metal air plant stand larger or smaller to accommodate any size air plant.   If you feel like you need to reinforce the metal so it’s sturdy enough for a heavier air plant, just glue 2 templates together with e6000 glue.

BTW…I’m now one of the cool kids with my two air plants.

meghan quinonesComment
How to Make a Clutch out of a Placemat

Now that Labor Day has come and gone, it means Summer has started to slowly move out of our lives.  This means major markdowns on anything and everything Summer related.  I recently popped into Crate and Barrel to see what kind of deals they had.  Most of their markdowns had been picked through already, except for one lonely placemat that caught my eye.

The placemat was round with a natural colored centered and a blue ring around the edge. I assume most people that saw this single placemat passed it up because who in the world can use a single placemat??? Not many.  I, of course, saw it and instantly thought of a project. Needless to say the lonely placemat made its way into my cart.

When I saw the round placemat, I naturally thought it would make a unique placemat purse.  I remembered seeing a purse back in the day that made me think of a placemat. Yes, this is how my brain works!  I was able to create a unique straw-like clutch for like $3! This placemat purse is a super easy project.  There is a little bit of sewing, but it’s by hand – no machine required!

Supplies:

– Straw placemat

– Yarn

– Large Needle (for your yarn)

– Purse Snap

– Felt

– Scissors

– Hot Glue Gun and Glue

Here’s how to make your own placemat purse:

{Step 1}:  Grab your felt and cut two squares 1.5 inches by 1.5 inches.

{Step 2}: Take your purse snap and make indentations in the center of your felt.  Do this to your other piece of felt.

{Step 3}:  Then, take your felt and fold at the indent you made and cut it with your scissors.

{Step 4}: Take the “prong” side of your snap and put it through the holes you just cut.  Grab the metal disc and put it over your snap.  Use your pliers to push the back of your snap over the disc, locking it in place.

{Step 5}: Take the other end of your snap and connect it to your snap.

{Step 6}: Repeat steps 2-4 for the other side of your snap.

{Step 7}:  Once your snaps are secure, you will glue the felt to the top back side of your place mat.

{Step 8}: Repeat step 7 to the other side of your snap.  You want to make sure it is directly across from the other side of your snap.

{Step 9}: Grab your yarn and make a small yarn ball.  You want to make sure you have enough yarn to go around your place mat with it folded in half.  Fold your placemat in half.  Pinch the corner where you folded your placemat in half.  Tie a knot in your yarn and push your needle through your placemat from the inside out.

{Step 10}: You will keep going from the inside of your placemat, up and over, and then back in to the inside through the other side of your placemat.  This will sew the two sides together.

{Step 11}: Keep sewing until you are about 4 inches from the middle of your placemat.

{Step 12}:  Finish your end off.

{Step 13}: You will tie a knot from the inside of your placemat so it can not be seen.  Repeat steps  9-13 on the other side of your purse.

{Step 14}: After my purse was sewed together, I went back and did the same type of stick  on the open (unsewn) ends of my purse.  This just pulled the entire purse together.

{Step 15}:  For added detail,  I sewed a small design on one side of my purse.  I went from the inside of my purse and then out making varying line lengths.

meghan quinonesComment
How to Make A Coaster

I recently purchased a new coffee table for my living room.  I figured it was time for me to be an adult and do my best to try and avoid water marks.  To help in my fight against water rings and extending the life of my table, I figured it was time for some coasters, but not just any old coasters-brightly colored DIY Parachute Cord Coasters!

For my coasters, I chose light wooden beads to use along with my parachute cord, which were the perfect size to give my coasters the lift they needed.  The natural color of the wood really pops against my cord. These coasters are definitely a nice addition to my coffee table!

Supplies:

  • Parachute Cord

  • Wooden Beads

  • Hot Glue Gun and Glue

  • Scissors

  • Lighter

Step 1: Cut your cord about 7 inches long.  You will need to cut 5 pieces of cord that are all the same length. These are what you will string your beads on.


Step 2: Tie a knot at the end of your parachute cord and burn the end with a lighter.


Step 2: String a bead onto your cord.


Step 3: Continue stringing your beads onto your cord until you have six beads strung.


Step 4: Tie a knot as close to your last bead as possible. Cut the excess cord off with your scissors and burn the end with a lighter.


Step 5: Continue Steps 1-4 until you have a total of five cords strung with six beads on each. These will be the base of your coaster.


Step 6: Place a dab of glue on the sides of all 6 of your beads. You want to make sure your glue dots aren’t too big.


Step 7: Attach one strand of beads to the first strand, lining up each bead with the prior bead.


Step 8: Continue gluing your bead strands to one another until all 5 strands have been glued. If you find any loose glue string in-between your beads, a hair drier can work wonders!  All you need to do is point your hairdryer at the glue strings and watch as they melt away. After all of your beads are glued (and your glue strings have been melted), your coasters are good to go!  Feeling inspired?  You can check out the full tutorial here!

Now that I have brightly colored DIY Parachute Cord Coasters on hand, I have no excuse for not using them.  It’s not like I won’t see them when I go to place my glass on my coffee table! You can check out the full tutorial here!

meghan quinonesComment
How to Embellished a Clutch

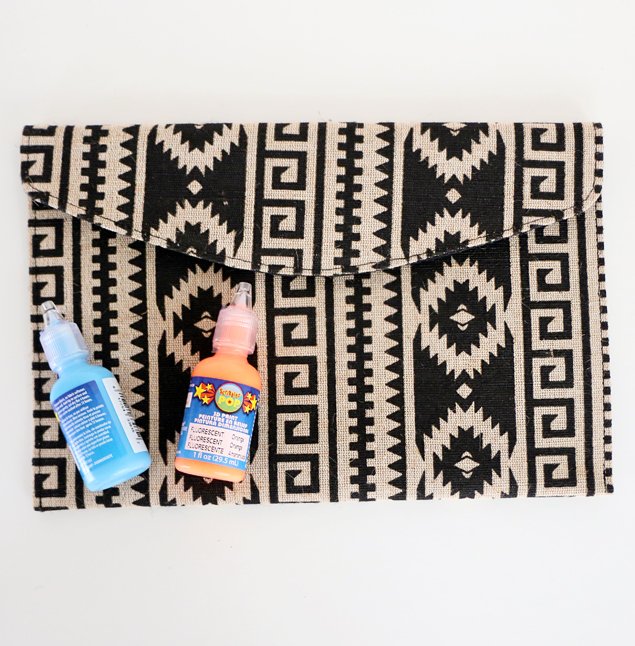
 was recently at a street fest, wandering past the vendors that were set-up in the streets and checking out all of their goods.  Now, I don’t usually shop at street fests since I am typically there to enjoy the live music and a cocktail or two. ;)  However, at this street fest, I spied a fun Aztec style clutch that was super cute.  I walked over to get a closer look at it and saw it was only $8.  I honestly couldn’t pass up the price for this fun little clutch, so I bought it.  When items are this cheap, it’s hard for me to say “NO!”.

My initial plan was to use my street fest clutch as my go-to clutch this Summer.  After looking at the design for a bit, I felt it could use a little bit of color.  I saw a really cool clutch (very similar to mine) that had pretty bead work on it.  Since I have zero patience to actually sit down and add tiny seed beads to anything, I wanted to come up with an easy workaround that would not test my patience.

Do you remember Puffy Paint? I used to use this stuff on t-shirts and sweatshirts to create my own New Kids on the Block fashion statement (yes, people this was before the other boy bands emerged).  Since Puffy Paint is dimensional, I thought it would be the perfect solution to create little “beads”.  Puffy Paint wins again!  This time around it’s a little more fashionable than my NYKOTB outfits. :)

Supplies:

Step 1: Use your orange puffy paint to create dots of paint on your clutch.  I chose to go over the black part of the Aztec design on my clutch.

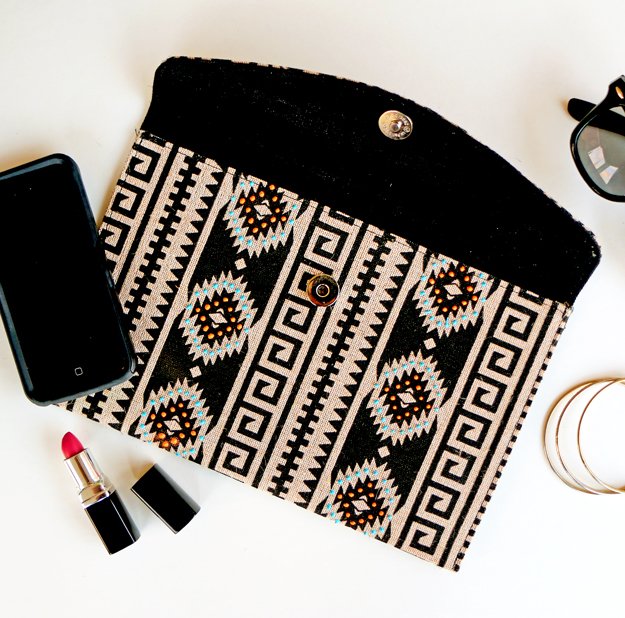
Step 2: I added my orange dots to all of the inside black aztec designs and let them dry.

Step 3: I then added blue dots around the outside of all of my orange dots.

Step 4: Once the paint was dry on the back side of my clutch, I flipped it over and added my painted bead design to the back.

All you need to do is added your accessories to your clutch and you are in business!

meghan quinonesComment
I'm in a Magazine!

It has been WAAAY too long since my last post. What most of you probably don’t know, is I was actually pregnant (with twins!) hence my lack of posts.  I delivered my little bundles of joy back at the end of March. Let’s just say my DIY/blog time has seriously taken a hit given my mommy duties times two!  One day I will be back on here posting more consistently.  I recently had a super cool experience that I wanted to share with all of you.

Long story short, back in January I was fortunate enough to have been at the right place at the right time when my co-worker in crime, Katy, and I met Jo Packham at CHA.  Come to find out, Jo is the brain (i.e Creator and Edit-in-Chief) behind the GORGEOUS magazine Where Women Create.  At that time, I had the current issue of the magazine on my coffee table, so needless to say I was pretty pumped when we met her in person.  After chatting for a few minutes, Katy and I had ended our convo with Jo about our features (yes, FEATURES!) in her magazines Where Women Create (for me) and Where Women Create – Business (for Katy).  We were both super excited to have a feature in such a beautiful magazine.

My issue was first.  I am featured in the August issue, which is on stands now.  In my feature, I share my story of how I was able to turn my passion into my career along with the creative space I get to work in everyday at Blitsy!

If you want to read my full story, you can purchase my issue at Barnes and Noble.

meghan quinonesComment
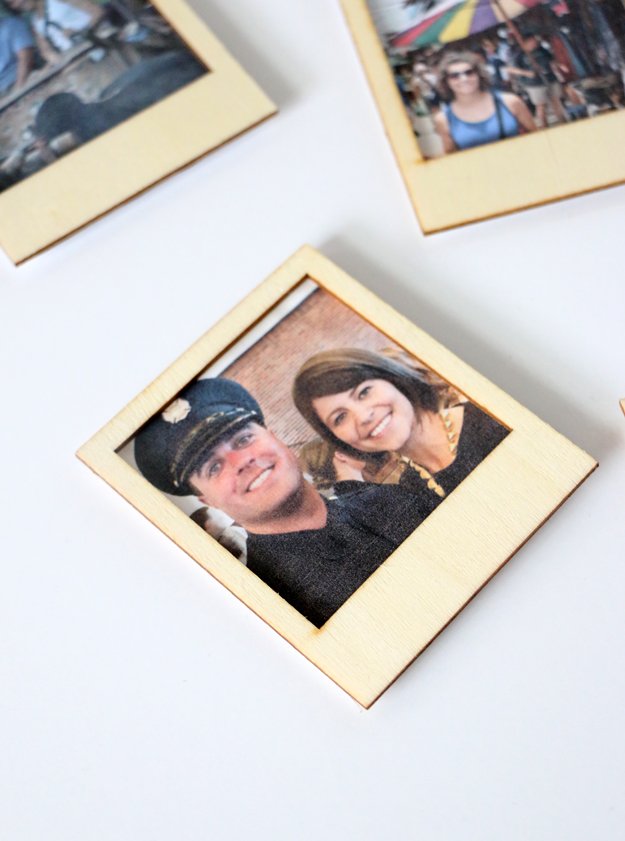
Turn Instagram photos into Polaroid Magnets

Photography has grown substantially in the last few years.  Since pretty much every single cellphone is now equipped with a camera, people are shooting pictures left and right and documenting their daily happenings.  Most people solely use their phone as their go-to camera and very rarely have a real camera handy when they are out-and-about. This means people are storing all of their pictures on their phones, making it very uncommon for them to actually do anything with all of the photos they have snapped.

As Instagram has gained more popularity, all of the photos being taken on phones are now being shared with friends, family, and followers. Even the iconic ‘square’ Instagram photo has gained popularity and people are now embracing the shape when it comes to cropping their images.  I decided to take the concept of Instagram (i.e square photos) and share a way to actually print out those photos from family vacations, surprise birthday parties, and special moments you have captured and turn them into something super cool.

You can easily turn your Instagram photos into adorable, functional magnets. Not only will these magnets keep papers neat and tidy on your fridge, but they will also put your favorite moments captured on your phone in a place for all to see.  The only problem now is  deciding which photos in your album to turn into magnets!

See the full tutorial here!

Grab the supplies:

meghan quinonesComment
Easy DIY Artwork

I have been really bad about posting house projects I have done in our “newish” home.  I have honestly done so many projects in the short year and a half Mike and I have lived in our house.  When I move into a new place, I am always on a mission to get it decorated right away.  I am kind of a freak like that.

Everyone told me when I moved into my house it would be a work-in-progress and that it would take some time to get everything set-up and organized.  Well, my entire house is pretty much decorated at this point.  There are a few small unfinished projects I need to tackle and, of course, some major projects/renovations we would like to do, but these larger ones will have to wait.

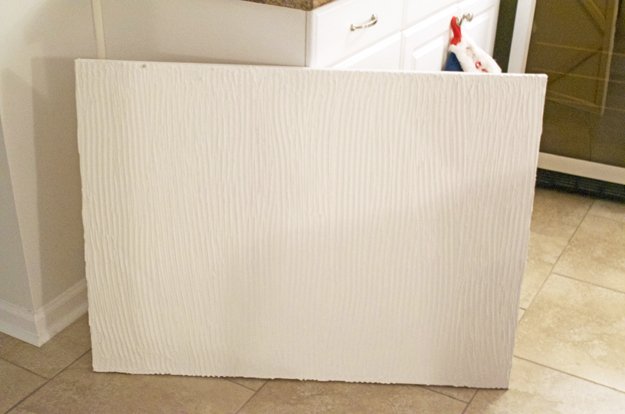
We had a plain wall in our bedroom that was just begging to be decorated.  I wasn’t really sure how I was going to decorate this decent sized wall, but knew it needed some artwork. Over the Summer, I was lucky enough to score a large canvas (which was from Blick still in the wrapper!) for $5 at a rummage sale!  If I had purchased this canvas from Blick, it would have cost over $50! When I was trying to think of a design to put on my canvas, I came across this amazing DIY artwork using wall composite on a canvas and then covered the center with paint.  I was blown away at how amazing the piece of art looked (and how easy it was to make) that I decided this would be the perfect art addition to my bedroom.

After I finished my artwork, I knew the wall would need a little more decor to finish it off. Of course, I had been at a rummage sale and picked up these two shelves (that may have actually been to hang plates???) for $4!  I’m not really sure what their purpose was, but I knew I liked them.  My shelves were originally an oak finish, but I ended up going over the wood with a coat of white paint to brighten them up a bit. I left the black metal rods alone; I liked them just the way they were.

Once I had my artwork and my shelves hung, it was time to add some trinkets to it.  I went to my local thrift store and picked up two wooden vases, a black picture frame (which was perfect for the empty space next to my shelf!), and a mini silver shadowbox frame.  I grabbed a small wooden box, porcelain bird, faux succulent, faux Ranaculous, and moss from the craft store. I plopped my faux plants into my vases and found a random quote card I had that I placed inside of my frame.  For my black frame, I used a template to stitch a floral design on paper and used embroidery floss to stitch it.  Once it was finished, I added it to my frame for another easy piece of artwork!

There you have it, my wall space in my bedroom filled with repurposed goods and DIY artwork!

meghan quinonesComment
How to Make Clay Beads

I have always had a fascination with clay.  I love the texture of it as well as it versatility. There are honestly so many projects where you could incorporate clay.  I decided to take my love of clay one step further and created my own beads for a one-of-a-kind necklace!

I paired white and yellow clay beads alongside wooden beads for a fresh, trendy look. Since making this clay bead necklace, I have received a TON of compliments on it.  There is nothing better than someone telling you they love your necklace and then asking where you bought it.  I love being able tell people I made it!

Check out my tutorial below to see just how easy it is to create your own beads out of clay and turn them into a striking statement necklace!

Here’s what you’ll need:

  • Yellow and White Sculpey Clay

  • Parachute Cord Ribbon

  • Clay Cutting Tools

  • Jewelry Pliers and Cutters

  • Clasp

  • Wooden Beads

  • Jewelry Wire

  • Awl

  • Over Safe Pan

Step 1: Pinch off a piece of your yellow clay and form it into a ball using the palms of your hands.

Step 2: Use your clay poking tool to add holes to  your clay, forming it into a bead.

Step 3:  Repeat the above steps, creating a bunch of yellow and white beads in different sizes.

Step 4:  Once you’ve created all of your clay beads, preheat your over according to the directions on your package of clay.  I added a layer of foil over my dish to protect it from the clay.  Bake your clay according to the directions on the package.

Step 5: After trying to use parachute cord, I realized it was too thick for the holes in my beads.  So, I ended up switching to ribbon.  Wrap your ribbon around your neck to get your desired length.

Step 6: Cut a piece of jewelry wire about 3 inches long. Push it through the end of your parachute cord ribbon.  Then, fold both of your wire ends up so they are against your cord.  Wrap the end of your wire around your ribbon, leaving one of the wire ends long.


Step 7: String one of your wooden beads.


Step 8: Use your jewelry tools to create a loop with the one wire end you left long.


Step 9:  Open the loop you created and slide on your clasp.


Step 10: String all of your clay beads, adding wooden beads throughout.


Step 11: Repeat Steps 6-8 to finish off the end of your necklace.


See how easy that was?!  You could create a bunch of these necklaces in different colors!


meghan quinonesComment
How to Make A Vertical Garden

Every time I am at Home Depot (which is pretty much all of the time!), I always find myself lingering around the houseplants.  They have so many different succulents in this area. We all know this is really the only kind of houseplant I am allowed to have since it takes a little more effort to kill these type of plants.  I was having some serious plant envy the last time I was Home Depot so I decided to pick-up a few.  Whoops!

I wanted to somehow incorporate more plants into my kitchen, but I don’t have a ton of counter space.  I didn’t want to turn my window ledge into a tropical forest, so I decided to create a vertical garden up the side of my cabinets!

All I did to create this magical look was paint some plastic pots and use Command Hooks to hang them.  It was so easy!  They best part about Command Hooks is if you decided you don’t want your vertical garden anymore, you can just remove the strips – no harm, no foul!

Here’s what you’ll need:

  • 3 Plastic Pots

  • Spray Paint

  • Awl

  • Small Clear Command Hooks

  • Potting Soil

  • Succulents

Step 1:  Grab your awl and apply pressure to your plastic pot about an inch down from the top.  You will see the awl start to puncture the pot.  Keep pushing your awl until it is all the way through your pot.

Step 2: Spray the outside of your pot with your spray paint.  I ended up doing 2 coats of paint.  You will also want to spray paint the inside of your pot a couple of inches down.

Step 3:  After your paint has dried, toss in some potting soil and your succulent.  Once your plants have been potted, it’s time to add your hooks.  Figure out the spacing you want for your planters.  Once you do, add your hooks and then push the hook through the hole in your planter, and hang your other planters.  You now have a garden that you can see, but won’t take up any of your counter space!

So, after I saw the result of my spray painted job, I was a little unsure of the color in my kitchen.  So, I ended up painting my pots with a lighter peach color.  I really like how the lighter color turned out. :)

meghan quinonesComment
How to Stain a Table

After I bought my couch for my back porch, I knew I wanted to add a coffee table since my goal was to turn my back porch into an outdoor living room.  I really did not want to buy a coffee table (I was trying to decorate my porch on the cheap), so I decided to do a quick alley run one evening to see if I could find something to use as a coffee table.  No joke, within minutes, I found a wooden crate that was the perfect size for my porch!  This wasn’t just any old crate, it was almost like it was meant to be a coffee table (who knows, that’s what it may have actually been!).  The bottom planks of the crate were missing, which is what gave me the idea to use it as a coffee table. So, into my Jeep it went.

I knew my crate needed some love and my initial thought was to paint it.  I wanted to paint it white, but quickly realized that would not be the best choice since the likelihood of shoes being on it meant the bright white color would quickly fade.  Instead of painting my crate, I decided to stain it. I went with a dark ebony colored stain.  Before I started staining my crate, I ran my sander over the top to smooth out any rough areas.

After I stained all sides of my crate (including the inside), I thought it could use a little lift to make it a tad bit higher.  I originally thought I would add caster wheels to the bottom, but soon found out that the wheel size I needed for my crate did not come with locks.  The last thing I wanted was a coffee table that moved all over my porch!

I was at the craft store and ended up in the woodworking aisle looking for an alternative to caster wheels.  I saw these wooden shapes that looked like cones.  They were actually called “Doll Bodies”, but to me they looked like Mid-Century Modern legs…perfect for my coffee table!  After I bought the doll bodies (so weird), I added some stain to them so they would match my table.  After the stain was dry, I glued the legs to the bottom of my crate.

Total cost of my outdoor coffee table: $6

Crate – Free

Doll Bodies: $2

Minwax Stain in Dark Walnut: $4

meghan quinonesComment
Easy DIY Clay Pendant

Guess what?  I have even more projects for you guys!

I was recently contacted by DIYs.com (a DIY inspiration website) to contribute monthly projects to their site on behalf of Blitsy.  This means EVEN more projects inspirations coming your way!

For my first project, I ended up making a marbled pendant necklace. Marbling has become very popular lately, so what better way to embrace the trend than with a necklace!  You won’t believe how easy it is to get the look of marble, but at a fraction of the price. You can see the full tutorial here.

If you love the project and need to make your own, you can get the supplies now at Blitsy!

meghan quinonesComment
How to Use Chalk Paint

By now, you probably know that I love finding a good alley treasure.  I literally get a high when I notice something made of wood during a quick alley scan.  I swear, I have trained my eyes to see all wood objects from far distances (even though I am near-sighted!). I will not lie, sometimes what looks like wood is actually cardboard.  Like I said, my eyes are not the best!

One day while trolling an alley by my house, an oak coffee table found its way onto my radar. As I got closer to the “wooden object”, I was delighted to see it was actually wood.  After a quick inspection, I thought it was good enough to snag.  Now, I had Mike’s car (aka our new car) and was a little hesitant to throw it in the back.  I ended up channeling my dad’s crazy car OCD and gingerly placed the coffee table into the car, taking extra care to ensure nothing touched the sides. Mission accomplished!

On my home with my treasure, I began brainstorming what I wanted to do with it.  I was thinking of maybe going with a bright, funky color, but as I looked closer at the table, I realized a funky color wouldn’t jive with it.  My coffee table felt more like Pottery Barn and less like CB2. So, I decided to update it accordingly.

I went with a darker gray color for my coffee table. I was going to stain the top a dark walnut color (similar to my kitchen table) and paint the legs gray, but ended up painting everything gray.  First, I sanded the top to smooth out some of the dings and scratches. After I sanded the top, I made my own chalk paint and painted my entire coffee table with it.  After the paint dried, I went over it with a furniture wax. Now, I am trying to sell it my cute little Pottery Barn inspired coffee table. Any takers? :)

meghan quinonesComment
Easy DIY Necklace for Beginners

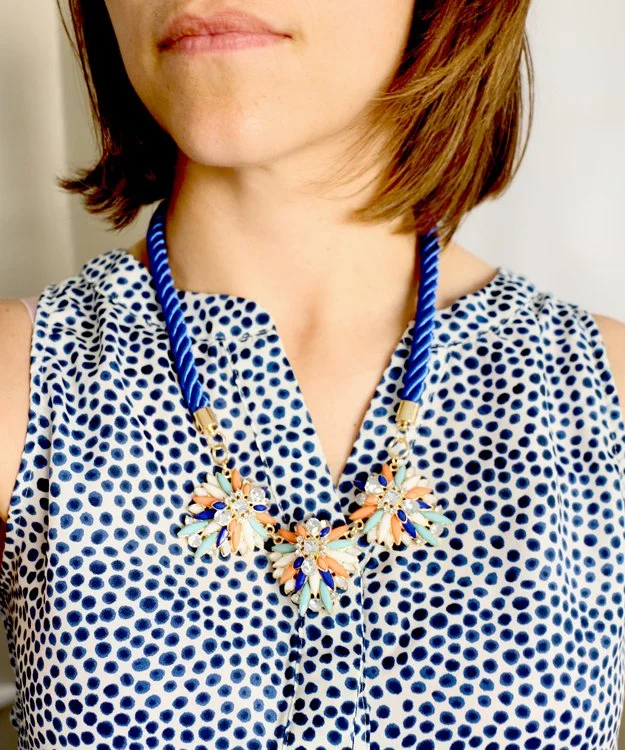
Look at that, I made a necklace! It has seriously been FOREVER since I made a necklace. My thing has always been jewelry, but lately I have been busy doing projects around my house and have kind of put my jewelry making to the side.  It makes me look good, but not my house, and we all know I am in house mode!

When you see this necklace, you probably think, “Wow, it must have been super hard to make!”.  Truth be told, this necklace took less than two minutes to make and it was so simple, even a child could do it!  I love the look the of J.Crew necklaces. They are always so pretty and make such a statement.  I am usually on some sort of clothing/accessory budget and don’t usually spend a ton on clothing (which is why I usually try to make everything I see at J.Crew!).  When I saw these jewelry components from Darice that looked like something I would buy from J.Crew, I nearly squealed!

The Darice Statement Looks allow you to mix and match your components to create jewelry in a snap, and not just any old jewelry, jewelry that rivals anything you would buy from J.Crew! Did I mention, this jewelry is WAAAY cheaper than any piece you would buy from J.Crew? You could make a few of these and the price would still come in under one necklace from J.Crew, just sayin’.

Here’s what you’ll need:

– Darice Statement Looks Chain

– Darice Statement Looks Statement Piece

– Jewelry Pliers


Step 1: Open one jump ring of the end of your chain.


Step 2: Slide the jump ring from your statement piece on and close.


Step 3: Repeat Steps 1 and 2 on the other side of your chain.


That’s all folks!  See, I told you it was the easiest piece of jewelry to make EVER!

meghan quinonesComment